
Are you the proud owner of a tiny house? If so, you know just how important it is to protect your investment from the elements. Weatherproofing your tiny house is essential to ensure its longevity and to create a comfortable living environment.
In this article, we will explore the best safeguard techniques for weatherproofing your tiny house, so you can rest easy knowing that your home is well-protected.
When it comes to tiny houses, proper weatherproofing offers numerous benefits. Firstly, it helps to prevent any water leakage, which can lead to mold and rot. By keeping the water out, you can maintain a healthy living space and avoid costly repairs down the line. Additionally, weatherproofing helps to insulate your tiny house, keeping it warm in the winter and cool in the summer. This not only enhances your comfort but also reduces your energy consumption and utility bills.
So, if you want to ensure the longevity, comfort, and efficiency of your tiny house, read on to discover the best safeguard techniques for weatherproofing.
Contents
- 1 Importance of Weatherproofing for tiny house
- 2 Benefits of Proper Weatherproofing
- 3 Understanding the Impact of Weather on Tiny Houses
- 4 Weatherproofing Techniques to safe your tiny house
- 4.1 Proper Roof Insulation
- 4.2 Roof Sealants and Coatings
- 4.3 Installing Drip Edges and Flashing
- 4.4 Exterior Siding and Cladding Options
- 4.5 Applying Weather-resistant Paints
- 4.6 Caulking and Sealing Wall Gaps
- 4.7 Weatherstripping Installation
- 4.8 Upgrading to Energy-efficient Windows and Doors
- 4.9 Adding Storm Shutters or Protective Coverings
- 4.10 Weatherproofing Foundation Walls
- 4.11 Elevated Flooring Solutions
- 4.12 Insulating Crawl Spaces
- 5 How much does it cost for weatherproofing for a Tiny house
- 6 How weatherproofing work for extreme climates
- 7 Conclusion
Importance of Weatherproofing for tiny house

Weatherproofing is of utmost importance when it comes to safeguarding your tiny house. As a tiny house owner, you understand the value of protecting your investment from the harsh elements. Proper weatherproofing ensures that your house remains structurally sound and protected from any potential damage caused by rain, wind, or extreme temperatures. Without proper weatherproofing, your tiny house could be susceptible to leaks, mold, pests, and even structural damage over time.
Therefore, it’s crucial to take the necessary steps to weatherproof your tiny house and ensure its longevity. To begin with, one of the essential aspects of tiny house weatherproofing is to seal all openings and gaps. These could include windows, doors, vents, and even electrical outlets. By using weatherstripping and caulking, you can effectively prevent water infiltration and heat loss. Additionally, it’s advisable to install a vapor barrier to control moisture levels and prevent condensation inside your tiny house. This will help protect against mold growth and maintain a healthy living environment.
Furthermore, choosing suitable materials for the exterior of your house, such as durable siding and roofing, can significantly contribute to its weatherproofing. These materials should be able to withstand harsh weather conditions and provide a reliable barrier against rain, wind, and snow. Overall, investing in proper house weatherproofing measures will not only protect your tiny house but also provide a comfortable and secure living space for years to come.
Benefits of Proper Weatherproofing
By ensuring that your tiny house is properly protected against the elements, you can create a space that’s not only comfortable but also more energy-efficient and cost-effective in the long run. Proper weatherproofing for your tiny house offers numerous benefits that make it a worthwhile investment.
Firstly, it helps to maintain a comfortable indoor temperature regardless of the weather conditions outside. By sealing any gaps or cracks in the walls, windows, and doors, you can prevent drafts from entering your tiny house, keeping it warm in the winter and cool in the summer. This not only enhances your overall comfort but also reduces your reliance on heating or cooling systems, leading to significant energy savings.
Secondly, weatherproofing your tiny house helps to protect it from moisture damage. By installing proper insulation and using moisture-resistant materials, you can prevent water from seeping into the walls, floors, or roof, which can lead to mold growth and structural issues. Moisture damage can be costly to repair and can also negatively impact your health. By investing in weatherproofing measures, you can safeguard your tiny house from potential water damage, ensuring its longevity and minimizing future maintenance costs.
Overall, proper weatherproofing for your tiny house is essential for creating a comfortable, energy-efficient, and durable living space.
Understanding the Impact of Weather on Tiny Houses
When it comes to understanding the impact of weather on your tiny house, there are three key points to consider.
First, rain and water damage can wreak havoc on your home if it’s not properly weatherproofed.
Second, strong winds can test the structural integrity of your tiny house, so it’s important to ensure it’s built to withstand these forces.
Lastly, extreme temperatures can pose challenges, so it’s crucial to have proper insulation and ventilation in place to maintain a comfortable living environment.
Rain and Water Damage
To protect your tiny house from rain and water damage, make sure you regularly inspect and maintain the roof and gutters. The roof is the first line of defense against rain, so it’s crucial to keep it in good condition. Check for any signs of damage, such as missing or cracked shingles, and repair them promptly.
Additionally, make sure the roof is properly sealed to prevent water from seeping through. Regularly cleaning the gutters is also essential to ensure proper water drainage. Clear out any debris, leaves, or twigs that may have accumulated, as clogged gutters can lead to water overflow and potential damage to your tiny house.
In addition to roof and gutter maintenance, consider installing weatherproofing measures to further protect your tiny house from rain and water damage. Apply a high-quality waterproof sealant to the exterior walls to prevent water penetration. Inspect the windows and doors for any gaps or cracks that may allow water to seep in and seal them accordingly.
It’s also advisable to elevate your tiny house on a sturdy foundation, such as concrete blocks or piers, to prevent water damage from flooding. By taking these simple yet effective steps, you can safeguard your tiny house from rain and water damage and ensure its longevity and durability for years to come.
Wind and Structural Integrity
Protecting your tiny house from wind and ensuring its structural integrity is crucial for its safety and longevity. Wind can cause significant damage to your tiny house if it isn’t properly prepared and secured.
One of the first steps in safeguarding your tiny house against wind is to choose a sturdy and well-built foundation. Whether you opt for a concrete pad or a trailer, make sure it’s designed to withstand strong winds. Additionally, consider installing hurricane straps or tie-downs to anchor your tiny house securely to the ground. These straps help distribute the wind load and prevent your house from being lifted or shifted during heavy gusts.
Another important aspect of windproofing your tiny house is ensuring its walls and roof are properly sealed. Check for any gaps or cracks that could allow wind to penetrate and cause damage. Use weatherproofing tape or caulk to seal any openings and reinforce the structural integrity of your tiny house. Additionally, consider installing impact-resistant windows and doors that can withstand high winds.
These measures will not only protect your tiny house from wind damage but also enhance its energy efficiency. By taking these precautions, you can rest assured that your tiny house is well-prepared to withstand strong winds and maintain its structural integrity for years to come.
Extreme Temperatures
Now that you’ve learned about the importance of wind and structural integrity in weatherproofing your tiny house, let’s dive into another crucial aspect: extreme temperatures. As a tiny house owner, it’s essential to safeguard your home against both scorching heat and freezing cold.
By taking the necessary precautions, you can ensure a comfortable living environment all year round. To protect your tiny house from extreme temperatures, insulation is key. Proper insulation helps regulate the indoor temperature, keeping it cool during hot summers and warm during chilly winters. Consider using high-quality insulation materials such as foam board, spray foam, or even natural alternatives like sheep’s wool or recycled denim.
Make sure to insulate all exterior walls, floors, and ceilings to minimize heat transfer and prevent drafts. Additionally, don’t forget to insulate your windows and doors, as these areas are prone to heat loss or gain. Proper insulation not only helps with temperature control but also reduces energy consumption, making your tiny house more eco-friendly and cost-efficient.
Weatherproofing Techniques to safe your tiny house
To ensure your tiny house is properly weatherproofed, there are several key techniques you should consider.
First, make sure you have proper roof insulation to prevent heat loss and protect against leaks.
Second, consider using roof sealants and coatings to provide an extra layer of protection against water damage.
Lastly, installing drip edges and flashing will help redirect water away from vulnerable areas.
Additionally, choosing the right exterior siding and cladding options and applying weather-resistant paints will further enhance the durability and longevity of your tiny house.
Proper Roof Insulation
Ensure your tiny house stays cozy and dry by properly insulating the roof, allowing you to relax and enjoy your snug haven even during the harshest weather conditions. One of the most effective ways to insulate your roof is by using spray foam insulation. This method involves spraying a liquid foam onto the roof, which then expands and hardens into a solid, thermal-resistant material.
The foam fills every nook and cranny, creating a seamless barrier against heat loss or gain. Not only does spray foam insulation provide excellent thermal resistance, but it also helps to block out moisture and air leaks, preventing any potential damage from leaks or condensation.
With proper roof insulation, you can ensure that your tiny house remains comfortable and well-protected no matter the weather outside.
Another popular method for roof insulation is using rigid foam panels. These panels are lightweight, easy to install, and provide excellent insulation properties. Simply attach the foam panels directly to the roof surface, ensuring a tight fit to minimize any gaps.
Rigid foam insulation offers a high R-value, meaning it has superior thermal resistance, making it ideal for protecting your tiny house from extreme temperatures. Additionally, it acts as a sound barrier, reducing outside noise and creating a more peaceful living environment.
By properly insulating your roof with rigid foam panels, you can enhance the overall energy efficiency of your tiny house while creating a cozy and quiet space to call home.
Roof Sealants and Coatings
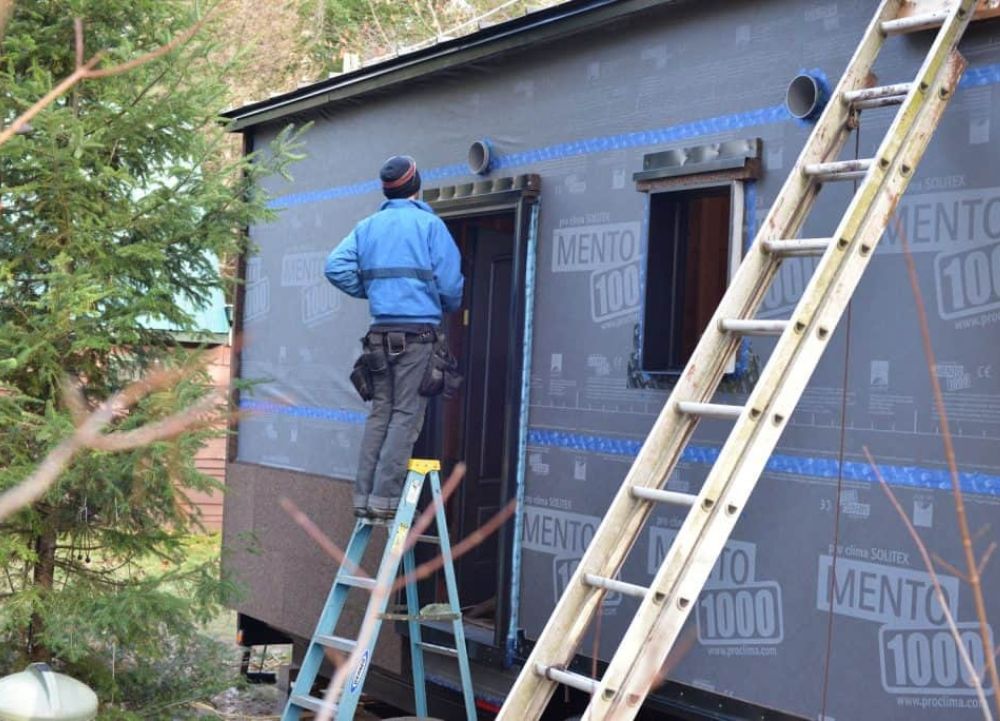
One effective way to protect your cozy haven from the elements is by using roof sealants and coatings. These products are specifically designed to create a barrier that prevents water, wind, and other weather elements from infiltrating your tiny house. Roof sealants are typically applied to the seams and joints of your roof, creating a watertight seal that keeps moisture out.
They come in various forms such as liquid, tape, or caulk, allowing you to choose the option that best suits your needs. On the other hand, roof coatings are applied directly onto the surface of your roof, forming a protective layer that shields it from UV rays, extreme temperatures, and potential damage caused by debris. They can also help improve the energy efficiency of your tiny house by reflecting sunlight and reducing the amount of heat absorbed by the roof.
When selecting roof sealants and coatings for your tiny house, it is important to choose high-quality products that are specifically designed for the type of roof you have. Make sure to read the manufacturer’s instructions and follow the recommended application process for optimal results.
Before applying the sealant or coating, thoroughly clean and prepare the roof surface to ensure proper adhesion. It is also a good idea to inspect your roof regularly and reapply sealants or coatings as needed to maintain their effectiveness.
By investing in roof sealants and coatings, you can significantly enhance the weatherproofing of your tiny house and enjoy a comfortable and cozy living space, no matter what the weather conditions may be.
Installing Drip Edges and Flashing
Make sure you install drip edges and flashing to protect your cozy haven from water damage and leaks.
Drip edges are installed along the edges of the roof to prevent water from seeping under the roofing material. They direct water away from the edges and into the gutters, ensuring that it doesn’t infiltrate your tiny house.
Flashing, on the other hand, is a material that is placed around chimneys, skylights, vents, and other areas where the roof meets a vertical surface. It creates a watertight seal, preventing any moisture from penetrating these vulnerable areas.
By installing both drip edges and flashing, you can effectively safeguard your tiny house from potential water damage and leaks.
When installing drip edges, make sure they’re installed properly and securely attached to the roof. They should extend over the edges by at least an inch, providing sufficient coverage and directing water away from the structure.
Additionally, ensure that the flashing is correctly installed around any protrusions on the roof. It should be tightly sealed to prevent any water from entering through gaps or cracks.
Regularly inspect the condition of your drip edges and flashing to identify any signs of wear or damage. If you notice any issues, promptly repair or replace them to maintain the integrity of your weatherproofing system.
Taking these precautions will help keep your tiny house dry and protected from the elements.
Exterior Siding and Cladding Options
Choosing the right exterior siding and cladding for your cozy haven can enhance its visual appeal and protect it from the elements. When it comes to weatherproofing your tiny house, there are several options to consider.
One popular choice is vinyl siding, which is known for its durability and low maintenance. Vinyl siding is resistant to moisture, rot, and pests, making it an excellent choice for protecting your tiny house from the elements. Additionally, vinyl siding comes in a wide range of colors and styles, allowing you to customize the look of your home.
Another option to consider is fiber cement siding, which is made from a blend of sand, cement, and cellulose fibers. This type of siding is highly durable and resistant to moisture, insects, and fire. Fiber cement siding can mimic the appearance of wood or other natural materials, giving your tiny house a rustic and charming look. It is also available in a variety of colors and textures, allowing you to achieve the desired aesthetic for your cozy abode.
Whichever exterior siding and cladding option you choose, make sure to properly install and maintain it to ensure its effectiveness in protecting your tiny house from the elements.
Applying Weather-resistant Paints
Now that you’ve chosen the right exterior siding or cladding for your tiny house, it’s time to take the next step in weatherproofing it – applying weather-resistant paints.
These paints serve as an extra layer of protection against the elements, ensuring the longevity and durability of your tiny house.
Weather-resistant paints are specially formulated to withstand harsh weather conditions such as rain, snow, and UV rays. They have excellent adhesion properties, preventing peeling and cracking, which can lead to water damage and rot.
By applying weather-resistant paints to your tiny house, you can enhance its resistance to moisture, mold, and mildew, keeping it in top shape for years to come.
When choosing weather-resistant paints for your tiny house, opt for high-quality options that are specifically designed for exterior use. These paints often contain additives that provide additional protection against fading and discoloration caused by sunlight.
Additionally, make sure to properly prepare the surface before applying the paint by cleaning and priming it. This will ensure proper adhesion and maximize the effectiveness of the weather-resistant paint.
So, don’t forget to add a layer of weather-resistant paint to your tiny house to provide it with the utmost protection against the elements.
Caulking and Sealing Wall Gaps
Ensure the longevity of your small home by properly caulking and sealing any gaps in its walls. Gaps and cracks in the walls can allow water, insects, and cold air to enter your tiny house, potentially causing damage and discomfort.
To prevent this, start by inspecting the walls thoroughly for any gaps or cracks. Use a caulk gun to apply a high-quality silicone or acrylic caulk to seal these gaps. Make sure to fill the gaps completely, smoothing the caulk with a putty knife or your finger for a neat finish.
In addition to caulking, consider using weatherstripping to seal any larger gaps or spaces around windows and doors. Weatherstripping is a flexible material, such as adhesive-backed foam tape or rubber strips, that can be placed along the edges of doors and windows to create a tight seal when closed. This helps to prevent drafts and keep the elements outside where they belong.
Regularly inspect the caulk and weatherstripping for any signs of wear or damage, and replace as necessary to ensure continued protection. By taking the time to properly seal gaps in your tiny house walls, you can enhance its weatherproofing capabilities and create a more comfortable and energy-efficient living environment.
Weatherstripping Installation
Improve the insulation and comfort of your small home by properly installing weatherstripping along doors and windows. Weatherstripping is a simple yet effective technique that helps to prevent drafts and keep your tiny house cozy.
To begin, start by measuring the length of the door or window frame where the weatherstripping will be installed. Cut the weatherstripping material to the appropriate length, making sure it fits snugly against the frame. Next, peel off the adhesive backing and carefully press the weatherstripping onto the frame, ensuring that it’s aligned properly. Use a putty knife or your fingers to firmly press down on the weatherstripping, ensuring a secure bond.
In addition to doors and windows, it’s also important to install weatherstripping along any other potential air leaks in your tiny house. This includes areas such as electrical outlets, pipe penetrations, and gaps between wall panels. By sealing these areas with weatherstripping, you can further enhance the insulation and energy efficiency of your small home.
Remember to regularly inspect and replace weatherstripping as needed, as it can wear down over time. With proper weatherstripping installation, you can significantly reduce drafts, increase comfort, and save on energy bills in your tiny house.
Upgrading to Energy-efficient Windows and Doors
Upgrade to energy-efficient windows and doors to enhance the insulation and reduce drafts in your small home, creating a more comfortable and cost-effective living space. Energy-efficient windows and doors are designed to minimize heat transfer, keeping the cold air out during winter and preventing hot air from seeping in during summer.
By upgrading to these types of windows and doors, you can significantly improve the overall energy efficiency of your tiny house. Energy-efficient windows and doors are typically made with multiple layers of glass and have a low-emissivity (low-E) coating. This coating helps to reflect heat back into the room and prevent it from escaping through the windows and doors.
Additionally, they are often equipped with advanced weatherstripping and sealing mechanisms to further reduce air leakage and drafts. These features not only help to keep your home at a comfortable temperature year-round but also contribute to lower energy bills by reducing the need for heating and cooling.
When upgrading to energy-efficient windows and doors, it’s important to consider the specific needs and climate of your location. Look for windows and doors with high energy efficiency ratings, such as ENERGY STAR certified products. Proper installation is crucial to ensure optimal performance, so it’s recommended to hire a professional for this task.
With energy-efficient windows and doors, you can enjoy improved insulation, reduced drafts, and a more energy-efficient tiny house.
Adding Storm Shutters or Protective Coverings
Looking to enhance your small home’s protection against extreme weather conditions? Consider adding storm shutters or protective coverings for added security and peace of mind.
Storm shutters are designed to cover your windows and doors, providing a barrier against high winds, flying debris, and heavy rain. They’re typically made of durable materials like aluminum or reinforced steel, ensuring long-lasting protection. These shutters are easy to install and can be operated manually or electronically, giving you the flexibility to open or close them as needed.
In addition to storm shutters, you can also opt for protective coverings such as plywood panels or impact-resistant films.
Plywood panels are a cost-effective solution that can be easily installed before a storm and removed afterward. They provide a physical barrier against strong winds and flying objects.
On the other hand, impact-resistant films are applied directly to the glass of your windows and doors. These films are transparent and virtually invisible, offering protection against shattering and reducing the risk of injury from broken glass.
By adding storm shutters or protective coverings to your tiny house, you can significantly improve its ability to withstand extreme weather conditions. These safeguards not only protect your windows and doors but also help reinforce the overall structure of your home.
So, whether you’re facing hurricanes, high winds, or heavy rainfall, investing in storm shutters or protective coverings is a wise choice to ensure the safety and durability of your tiny house.
Weatherproofing Foundation Walls
Ensuring the durability of your small home involves implementing effective strategies, such as properly weatherproofing the foundation walls.
Foundation walls are a crucial component of your tiny house, as they provide structural support and help to keep out moisture. To weatherproof your foundation walls, start by inspecting them for any cracks or gaps. Fill in any small cracks with a high-quality waterproof sealant and use an expanding foam to seal larger gaps. This will prevent water from seeping into your home and causing potential damage.
In addition to sealing cracks and gaps, it’s also important to apply a waterproof coating to your foundation walls. This can be done using a waterproofing paint or a rubberized membrane. These coatings create a barrier that prevents water from penetrating the walls and causing moisture-related issues. Be sure to apply the coating according to the manufacturer’s instructions and allow it to dry completely before moving forward with any further weatherproofing measures.
By properly weatherproofing your foundation walls, you can ensure that your tiny house is well-protected against the elements and will stand the test of time.
Elevated Flooring Solutions
To create a cozy and inviting atmosphere in your small home, consider opting for elevated flooring solutions. Elevating your flooring not only helps with weatherproofing, but it also adds a touch of style and functionality to your tiny house.
One option is to install a raised subfloor system, which creates a gap between your actual flooring and the ground. This helps to prevent moisture from seeping into your home and causing damage. The raised subfloor system can be made from materials such as pressure-treated wood or composite decking, which are highly durable and resistant to rot and decay. Additionally, this elevated flooring solution allows for better insulation, as the gap provides an extra layer of protection against the cold.
Another elevated flooring solution to consider is a raised platform or deck. This can be especially beneficial if your tiny house is built on uneven terrain or in an area prone to flooding. By building a raised platform, you can level the flooring and create a stable foundation for your home. This not only helps with weatherproofing, but it also provides a convenient outdoor space where you can relax and enjoy the surroundings.
You can choose from a variety of materials for your raised platform, such as wood or composite decking, depending on your preferences and budget. Whichever elevated flooring solution you choose, make sure to properly seal and treat the materials to ensure long-lasting weatherproofing for your tiny house.
Insulating Crawl Spaces
Now that you’ve learned about elevated flooring solutions for your tiny house, let’s move on to the next important step in weatherproofing: insulating crawl spaces.
Crawl spaces are the areas underneath your tiny house that provide access to utility lines and allow for ventilation. However, if they are not properly insulated, they can also be a major source of heat loss and moisture buildup.
Insulating crawl spaces is crucial for maintaining a comfortable and energy-efficient living environment in your tiny house. By adding insulation to the walls and floors of these spaces, you can prevent cold air from seeping in during the winter and keep the heat out during the summer.
This will not only help you save on heating and cooling costs but also protect your tiny house from potential damage caused by moisture and mold. There are various insulation options available, such as fiberglass batts, spray foam, and rigid foam boards, so you can choose the one that best suits your needs and budget.
Don’t forget to seal any gaps or cracks to ensure maximum insulation and to keep pests and unwanted critters out. With proper insulation in your crawl spaces, you can create a more comfortable and well-protected environment for your tiny house.
How much does it cost for weatherproofing for a Tiny house
Weatherproofing a tiny house can be quite costly, but the peace of mind and protection it provides against the elements is well worth the investment.
The cost of weatherproofing for a tiny house can vary depending on the specific techniques and materials used. On average, you can expect to spend anywhere from $2,000 to $10,000 or more for a comprehensive weatherproofing job. This cost includes materials such as insulation, sealants, and weatherstripping, as well as labor if you choose to hire professionals.
When considering the cost of weatherproofing, it’s important to remember that it is a long-term investment. By properly weatherproofing your tiny house, you can reduce energy costs by improving insulation and preventing drafts. This can lead to significant savings over time.
Additionally, weatherproofing helps to protect your tiny house from moisture damage, which can be costly to repair. It also helps to prolong the lifespan of your home by preventing issues such as mold and rot. So, while the upfront cost of weatherproofing may seem high, the benefits it provides in terms of energy efficiency, durability, and overall comfort make it a worthwhile expense.
How weatherproofing work for extreme climates
Living in an extreme climate, you’ll want to ensure that your tiny house is well-prepared to withstand the harshest weather conditions.
Weatherproofing for extreme climates involves a combination of insulation, sealing, and reinforcement techniques.
One of the most important aspects is to have a well-insulated building envelope. This means adding insulation to the walls, roof, and floor to prevent heat loss in cold climates and heat gain in hot climates. Insulation helps maintain a comfortable temperature inside your tiny house and reduces the need for excessive heating or cooling.
In addition to insulation, sealing any potential air leaks is crucial. Tiny houses are more prone to air leakage due to their smaller size and construction methods.
Seal all gaps and cracks around windows, doors, and any other openings to prevent drafts and to keep the elements outside. Using weatherstripping and caulking can effectively seal these areas.
Lastly, reinforcing your tiny house’s structure is essential in extreme climates. This can include using hurricane straps or tie-downs to secure the house to its foundation in high wind areas or adding additional bracing to withstand heavy snow loads.
By implementing these weatherproofing techniques, you can ensure that your tiny house can withstand the toughest weather conditions in extreme climates.
Conclusion
In conclusion, weatherproofing your tiny house is essential to ensure its longevity and protection against the elements. By properly sealing and insulating your home, you can prevent moisture damage, mold growth, and energy loss. This not only saves you money on repairs and utility bills but also creates a comfortable living environment all year round.
Furthermore, understanding the impact of weather on your tiny house is crucial in determining the most effective weatherproofing techniques. Whether you’re dealing with extreme heat, cold, rain, or snow, there are various solutions available to safeguard your home. From using weather-resistant materials to installing proper ventilation systems, taking the necessary steps to weatherproof your tiny house will give you peace of mind and help your home withstand any weather conditions.
In conclusion, weatherproofing your tiny house may require an initial investment, but it’s a worthwhile expense to protect your home and ensure its durability. The cost of weatherproofing can vary depending on the size of your tiny house and the specific techniques used. However, considering the potential damage that can result from neglecting weatherproofing, it’s a small price to pay in the long run.
Remember, weatherproofing isn’t a one-time task. It requires regular inspections and maintenance to keep your tiny house in top shape. By staying proactive and addressing any weatherproofing issues promptly, you can enjoy the benefits of a well-protected and comfortable tiny home for years to come. So, don’t wait any longer – start weatherproofing your tiny house today and enjoy the peace of mind that comes with knowing your home is safe from the elements.