
Are you planning to build or renovate a tiny house and need some guidance on the plumbing for your bathroom? Look no further! In this article, we will provide you with essential tips for efficient installation of tiny house bathroom plumbing.
From understanding the basics to planning and executing the installation, we’ve got you covered. When it comes to the plumbing in your tiny house bathroom, it’s important to have a solid understanding of the basics. This includes knowing how to plan the layout, install the water supply system, and set up the drainage system.
With this knowledge, you can ensure that your tiny house bathroom functions efficiently and effectively. Additionally, we will discuss insulation and winterization tips to help you prepare for colder temperatures. So, let’s dive in and explore the essential components of tiny house bathroom plumbing and the maintenance tips to keep everything running smoothly.
Contents
- 1 Understanding the Basics of Tiny House Bathroom Plumbing
- 2 Tiny House Bathroom Plumbing Diagram
- 3 Planning Your Tiny House Bathroom Plumbing
- 4 Water Supply System Installation
- 5 Drainage System Installation
- 6 Dealing with Limited Space Challenges
- 7 Insulation and Winterization
- 8 Essential Components of Tiny House Bathroom Plumbing
- 9 Maintenance Tips for Tiny House Bathroom Plumbing
- 10 Maintenance Tips for Tiny House Bathroom Plumbing
- 11 Conclusion
Understanding the Basics of Tiny House Bathroom Plumbing

In a tiny house bathroom, you’ll need to understand the basics of plumbing to ensure efficient installation and create a functional and comfortable space. One of the key considerations is the type of toilet you choose. Many tiny house owners opt for a compost toilet, which is a sustainable and odor-free alternative to traditional flush toilets.
Compost toilets separate liquid and solid waste, allowing the solid waste to decompose over time. This not only eliminates the need for water and plumbing infrastructure but also creates nutrient-rich compost that can be used for gardening.
Another important aspect of tiny house bathroom plumbing is managing grey water. Grey water refers to wastewater that comes from sources such as sinks and showers. In a traditional home, grey water is usually connected to a sewer system, but in a tiny house, you’ll need to find alternative solutions.
One option is to collect and reuse grey water for tasks like watering plants or flushing toilets. Another option is to use a grey water filtration system to treat the water before it is released into the environment. Properly managing grey water is not only environmentally friendly but also essential for maintaining a hygienic and comfortable living space in your tiny house bathroom.
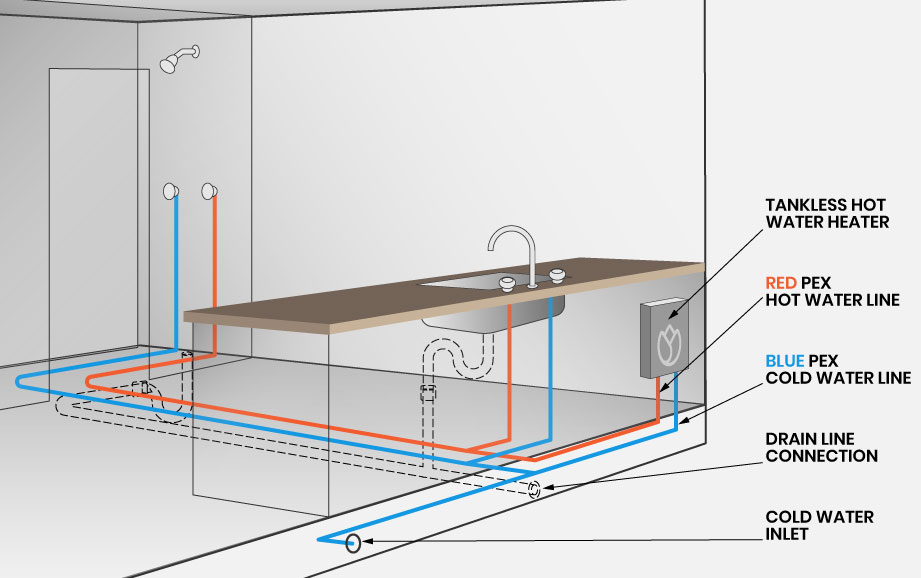
Tiny House Bathroom Plumbing Diagram
Start by visualizing the diagram of the plumbing setup for your compact living space. In a tiny house, efficient use of space is crucial, so understanding the layout of your bathroom plumbing is essential. The plumbing diagram will show you how the various components of your tiny house plumbing system connect and function. It will include details such as the location of the toilet, water heater, and other fixtures, as well as the pipes and connections that bring water in and take waste out.
By studying this diagram, you can gain a better understanding of how everything works together and plan your installation accordingly.
When looking at the tiny house bathroom plumbing diagram, you will notice that the toilet is typically positioned near an exterior wall to make it easier to connect to the main sewer line. The water heater is usually located nearby, allowing for efficient hot water supply to the bathroom fixtures.
Additionally, the diagram will show the pipes that connect the fixtures, such as the sink and shower, to the main water supply and sewage system. Understanding this layout will help you determine the best placement for each fixture and ensure that your plumbing system functions efficiently in your tiny home.
Planning Your Tiny House Bathroom Plumbing

When planning your tiny house bathroom plumbing, there are several key points to consider.
First, focus on optimizing bathroom space by carefully selecting fixtures and storage solutions that make the most of the available area.
Next, connect the water supply system efficiently to ensure a reliable and consistent flow of water.
Finally, installing a proper drainage system and ventilation will help prevent any issues with water damage and ensure a comfortable and functional bathroom in your tiny house.
Bathroom Space Optimization
To optimize your bathroom space, imagine stepping into a tiny oasis where every inch is cleverly utilized and surprises await around every corner. When it comes to tiny house bathroom plumbing, efficient installation is key to maximizing your limited space. Compact fixtures and space-saving solutions are essential for creating a functional and comfortable bathroom in your tiny home.
One way to optimize your bathroom space is by choosing compact fixtures such as a small sink and toilet. These fixtures aren’t just space-saving, but they can also add a touch of style to your tiny bathroom. Additionally, consider installing a shower stall instead of a bathtub to save even more space. A corner shower stall can fit snugly in the corner of your bathroom, leaving more room for other essential elements.
Another tip for bathroom space optimization is to utilize vertical space. Install shelves or cabinets above the toilet or sink to store toiletries and towels. You can also consider using a wall-mounted toilet to free up floor space. Additionally, make use of the space under the sink by installing a small vanity with built-in storage.
By following these tips for bathroom space optimization, you can create a functional and efficient bathroom in your tiny house. Remember to prioritize efficient installation of your tiny house bathroom plumbing and choose compact fixtures and space-saving solutions. With a little creativity and careful planning, you can make the most of every inch in your tiny oasis.
Connect Water Supply System
Connect your water supply system to your tiny oasis like a lifeline, ensuring a constant flow of water for your everyday needs. When it comes to plumbing in a tiny house bathroom, it’s crucial to have a reliable water supply system.
Depending on your situation, you have two options: connecting to an external water source or relying on a self-contained tank. If you have access to an external water source, such as a municipal water supply or a well, you can connect your tiny house plumbing system directly to it. This will provide you with a continuous supply of water without the need for storage tanks. However, if you’re in a remote location or prefer to be self-sufficient, you can opt for a self-contained tank system. This involves installing a water tank inside your tiny house and filling it up periodically.
Whichever option you choose, make sure to install a water pressure regulator to maintain a consistent water pressure and protect your plumbing system from damage.
Once you’ve decided on the type of water supply system for your tiny house bathroom, it’s time to connect it to your plumbing system. Start by installing a water inlet valve, which will allow water to enter your tiny house. This valve should be connected to a water filter to ensure the water is clean and safe for use. Next, connect the water lines from the inlet valve to your faucets, shower, and toilet. Use flexible PEX tubing for easy installation and to accommodate the limited space in a tiny house. Make sure to secure the connections properly to avoid leaks.
Finally, test the water supply system by turning on the faucets and checking for any leaks or irregularities. It may be helpful to have a professional plumber inspect and certify your plumbing system to ensure it meets the necessary standards.
By properly connecting your water supply system, you can enjoy a reliable and efficient plumbing system in your tiny house bathroom.
Installing Drainage System
Now that you’ve successfully connected the water supply system in your tiny house bathroom, it’s time to move on to the next crucial step: installing the drainage system. This is an essential aspect of your plumbing setup as it ensures efficient removal of wastewater from your bathroom.
With the right installation, you can effectively manage your eco-friendly wastewater system and maintain a clean and hygienic tiny house environment.
To begin, you’ll need to consider the layout and design of your bathroom to determine the most suitable location for your drainage system. Gravity plays a key role in this process, as it allows the wastewater to flow naturally downwards and out of your tiny house. This means that you’ll need to position your drainage pipes at a slight downward angle to ensure proper drainage.
Additionally, installing a vent pipe is crucial for preventing any unpleasant odors and maintaining proper airflow within the system. Remember to consult local building codes and regulations to ensure compliance with the standards in your area.
To help you with the installation process, here are some key points to keep in mind:
- Properly position the drainage pipes to allow for efficient drainage.
- Install a vent pipe to prevent odors and ensure proper airflow.
- Consult local building codes and regulations to ensure compliance.
- Consider using a composting toilet for a more eco-friendly wastewater management solution.
By following these tips and guidelines, you can successfully install the drainage system in your tiny house bathroom. This will not only ensure efficient removal of wastewater but also contribute to a more sustainable and eco-friendly living environment.
Ventilation
Proper ventilation is vital for maintaining a healthy and pleasant environment in your compact washroom. In a tiny house bathroom, where space is limited, it becomes even more crucial to have an efficient ventilation system.
Without proper ventilation, moisture and odors can quickly build up, leading to mold, mildew, and unpleasant smells. This can not only damage your bathroom fixtures and finishes but also pose health risks to you and your family.
Therefore, when planning your tiny house bathroom plumbing, it’s essential to consider incorporating a ventilation system that effectively removes excess moisture and keeps the air fresh and clean.
There are several options available for ventilation systems suitable for tiny houses. One popular choice is a bathroom fan that’s specifically designed for small spaces. These compact fans can be installed on the ceiling or wall and work by extracting the humid air and odors from the bathroom, expelling them outside.
Another option is a window exhaust fan, which can be installed in a small window or a dedicated opening in the wall. These fans are designed to pull the moist air out of the bathroom and vent it outside, ensuring proper air circulation.
Additionally, you can also consider installing a bathroom vent with a heat recovery system, which not only removes moisture but also recovers the heat from the outgoing air, helping to maintain a comfortable temperature in your tiny house bathroom.
By choosing the right ventilation system for your tiny house bathroom plumbing, you can ensure a fresh and healthy environment for your daily routine.
Water Supply System Installation

When it comes to your water supply system installation, there are a few key points to consider. First, you’ll need to select and install a well pump that meets your needs.
Next, managing water pressure is important to ensure a consistent flow throughout your tiny house.
Lastly, if you’re planning on using rainwater, filtering and treating it for use is essential.
Well Pump Selection and Installation
Choosing the right well pump and installing it correctly can ensure a reliable water supply for your tiny house bathroom – but what happens if you’re left without water?
It’s essential to select a well pump that can meet the demands of your tiny house bathroom, including the sink, shower, and toilet waste. Consider factors such as the size of your water tank, the depth of your well, and the flow rate required for all your fixtures.
Once you have chosen the appropriate well pump, it’s time to install it properly.
Installation of the well pump involves several steps. First, you need to dig a well that is deep enough to reach the water table. Then, you will need to install the pump at the bottom of the well, making sure it is securely attached. Connect the pump to your water tank using appropriate pipes and fittings. It’s important to ensure there are no leaks in the system to prevent water wastage.
Lastly, test the pump to ensure it is working efficiently and providing sufficient water pressure for all your bathroom needs.
By carefully selecting and correctly installing the right well pump, you can avoid any water supply issues and enjoy a fully functional tiny house bathroom.
Water Pressure Management
Managing water pressure in your tiny home’s plumbing system can ensure a satisfying shower experience without any unexpected surprises. Here are three essential tips for effective water pressure management:
1. Install a pressure regulator: A pressure regulator is a small device that controls the water pressure entering your tiny house. By installing one near the main water line, you can prevent high pressure from damaging your plumbing fixtures and appliances. This is particularly important if you plan to use a washing machine or a dishwasher in your tiny home. A pressure regulator helps maintain a consistent and safe water pressure level, extending the lifespan of your plumbing system.
2. Choose the right shower head: The type of shower head you select can significantly impact your water pressure. Opt for a shower head that’s specifically designed for low-pressure systems or has adjustable settings. These shower heads can enhance your shower experience by increasing the water pressure and providing a more enjoyable flow. Consider models that are water-efficient as well, as they can help conserve water while maintaining adequate pressure.
3. Check for leaks and blockages: Regularly inspect your plumbing system for any leaks or blockages that may affect water pressure. Leaks can cause a decrease in pressure, while blockages can lead to an increase in pressure. Take the time to examine all the pipes, valves, and connections in your tiny home and fix any issues promptly. This will not only ensure optimal water pressure but also prevent potential water damage and costly repairs in the long run.
By implementing these water pressure management tips, you can guarantee a satisfying shower experience in your tiny home while also protecting your plumbing system.
Filtering and Treating Rainwater for Use
Filtering and treating rainwater for use in your tiny home’s water system can transform your shower into a blissful oasis with an abundance of pure, crystal-clear water. When it comes to tiny house plumbing basics, incorporating rainwater as a water source can be a sustainable and cost-effective solution.
To ensure the water is safe and clean, it’s important to implement a filtration and treatment system. This involves installing filters that can remove debris, sediments, and contaminants from the rainwater before it enters your freshwater tank. By doing so, you can enjoy the benefits of rainwater without worrying about any potential health risks.
In addition to filtration, treating the rainwater is crucial to maintain its quality. Common methods include using ultraviolet (UV) light or chlorine to kill bacteria and other microorganisms that may be present in the water. These treatments help ensure that the water remains safe for use in your tiny home’s plumbing system.
By filtering and treating rainwater, you not only reduce your reliance on external water sources but also have the opportunity to create a self-sustaining water system. So, embrace the eco-friendly approach and enjoy the luxury of a refreshing shower with filtered rainwater in your tiny home.
Drainage System Installation
When installing the drainage system in your tiny house bathroom, it’s crucial to ensure that all pipes are properly connected to guarantee efficient water flow. This step is essential to prevent any potential clogs or backups that could disrupt your daily routine.
Here are some key points to consider during the drainage system installation:
Proper pipe sizing: Make sure to use the correct pipe sizes for different fixtures, such as sinks, showers, and toilets. Using pipes that are too small can lead to slow drainage and potential blockages. On the other hand, oversized pipes may not provide enough pressure for efficient water flow.
Ventilation system: Installing a ventilation system is vital to prevent unpleasant odors and allow for proper drainage. Vent pipes should be connected to the main drainpipe and extend above the roofline to release any trapped gases. This ensures that the drainage system functions effectively and maintains a pleasant bathroom environment.
By paying attention to these details during the drainage system installation in your tiny house bathroom, you can ensure an efficient plumbing system that will meet your needs while saving space. Remember to consult local building codes and regulations to ensure compliance and safety throughout the process.
Dealing with Limited Space Challenges
Navigating the constraints of limited space presents unique challenges, but with some strategic planning and creative solutions, you can optimize your tiny house bathroom to maximize functionality and comfort.
When dealing with limited space challenges in your tiny house bathroom, one option to consider is a composting toilet. Unlike traditional flush toilets, composting toilets require minimal space and don’t need a plumbing connection. These toilets use a natural process to break down waste into compost, which can be safely disposed of or used as fertilizer. Installing a composting toilet in your tiny house bathroom not only saves space but also eliminates the need for complicated plumbing systems.
Another way to overcome limited space challenges in your tiny house bathroom is by choosing the right plumbing fixtures and layout. Opt for compact and space-saving options such as corner sinks, wall-mounted toilets, and slimline showers. These fixtures not only take up less space but also create a visually open and airy feel in your bathroom.
Additionally, consider utilizing vertical space by installing shelves or storage units above the toilet or sink. This allows you to make the most of the available space and keep your bathroom essentials within easy reach.
By carefully selecting your plumbing fixtures and making efficient use of limited space, you can create a functional and comfortable bathroom in your tiny house.
Insulation and Winterization
If you’re looking to turn your cozy abode into an icy nightmare, skimp on insulation and neglect winterization altogether.
Insulation is crucial in a tiny house bathroom, especially during the winter months when temperatures drop. Proper insulation helps to maintain a comfortable and warm environment, preventing pipes from freezing and reducing the risk of damage to your plumbing system. Make sure to insulate all exposed pipes, including the ones leading to your tiny house toilet and water pump. Use foam pipe insulation or heat tape to wrap around the pipes and ensure they’re well protected.
Additionally, insulating the walls and floor of your bathroom will help to retain heat and keep the space cozy.
Winterization is another essential step in preparing your tiny house bathroom for the colder months. This involves taking preventive measures to prevent any potential issues caused by freezing temperatures. Start by disconnecting and draining the water supply to your bathroom fixtures, such as the toilet and sink. Emptying the water tanks and draining the pipes will help to ensure that no water remains and freezes during the winter. Consider using antifreeze in your toilet bowl to prevent any freezing or cracking.
Additionally, sealing any gaps or cracks in your bathroom walls and windows will help to keep out drafts and maintain a warmer temperature inside.
By prioritizing insulation and winterization in your tiny house bathroom, you can enjoy a comfortable and efficient space all year round.
Essential Components of Tiny House Bathroom Plumbing
When it comes to the essential components of your tiny house bathroom plumbing, there are a few key points to consider.
First, you’ll need to choose the right toilet for your space, taking into account its size and water efficiency.
Next, you’ll want to decide whether you’ll have a shower or bathtub in your bathroom, and make sure you have the necessary plumbing and drainage in place.
Lastly, don’t forget about the sink and faucet, as well as the water heater, which’ll provide hot water for all your bathroom needs.
Toilets for Tiny Houses
Looking to maximize space in your tiny house bathroom? Consider the various options available for toilets that are both compact and efficient.
One popular choice is a flush toilet, which operates using water to flush waste away into a sewer or septic system. These toilets come in different sizes and designs, allowing you to choose one that fits perfectly in your limited bathroom space. However, keep in mind that flush toilets require plumbing connections and access to a water source, which may not always be feasible in a tiny house.
If you’re looking for a more space-saving and environmentally friendly option, a dry toilet might be the way to go. Dry toilets, also known as composting toilets, do not use water but instead rely on a composting chamber to break down waste into compost. They are compact and easy to install, making them a great choice for tiny houses. Plus, they’re odorless and require minimal maintenance, making them a convenient and efficient option for your bathroom.
When considering toilets for your tiny house, it’s important to weigh the pros and cons of each option. Flush toilets are familiar and convenient, but they require plumbing connections and access to water, which may not always be available in a tiny house. On the other hand, dry toilets, such as composting toilets, are a more sustainable choice and don’t require water or plumbing connections. They can be installed easily and are compact, saving you valuable space in your tiny house bathroom. However, dry toilets may require periodic maintenance and the composting process can take some time.
Overall, the choice of toilet for your tiny house will depend on your specific needs and preferences. Consider factors such as available space, access to water, and your commitment to sustainability when making your decision.
Showers and Bathtubs
Consider the space-saving and relaxing options available for showers and bathtubs in your tiny house.
When it comes to showers, there are a variety of designs that can help maximize space efficiency. One option is a corner shower, which fits snugly into a corner and takes up minimal floor space.
Another option is a shower stall with sliding doors, which allows for easy access and doesn’t require extra space for a swinging door. Additionally, you can consider installing a shower drain in the center of the shower floor to save space and prevent water from pooling in one corner.
For bathtubs, compact options are available that can still provide a relaxing experience. Freestanding soaking tubs are a popular choice for tiny houses as they take up less space than traditional built-in tubs.
Another alternative is a small Japanese-style soaking tub, which is deeper and narrower than a standard bathtub, allowing for a luxurious soak while conserving space. Whichever option you choose, it’s important to consider the placement of the water line and hot water heater. Proper plumbing installation will ensure that your showers and baths are not only space-efficient but also provide a steady supply of hot water for a comfortable bathing experience in your tiny house.
Sinks and Faucets
To maximize functionality in your small space, opt for a compact sink and faucet design that doesn’t compromise on style or efficiency. When it comes to choosing a sink for your tiny house bathroom, consider a small kitchen sink that can serve dual purposes. A kitchen sink is typically deeper and wider than a bathroom sink, allowing you to wash your hands comfortably and even do some light dishwashing if needed.
Look for a sink with a single basin to save space and consider one with built-in storage underneath for added convenience.
When selecting faucets for your tiny house bathroom, water-saving options are a must. Look for faucets that are labeled as low-flow or water-efficient, as these will help conserve water and reduce your overall water usage. Additionally, consider faucets with aerators, which mix air with the water to create a steady flow while using less water. This can help you save even more on your water bill.
Lastly, don’t forget about the water inlet for your sinks and faucets. In a tiny house, it’s important to carefully plan the plumbing system to ensure efficient water supply. Consult with a professional plumber to determine the best location for the water inlet and to ensure proper installation.
By choosing the right kitchen sink, water-saving faucets, and properly planning the water inlet, you can create a functional and efficient tiny house bathroom that meets your needs without compromising on style or sustainability.
Water Heaters
Now that you’ve learned about sinks and faucets for your tiny house bathroom plumbing, let’s dive into the next essential component: water heaters.
In a small space like a tiny house, efficient use of hot water is key. With traditional storage water heaters, you may end up wasting a significant amount of hot water. They constantly keep a large tank of water heated, even when you’re not using it. This not only leads to higher energy consumption but also takes up valuable space in your tiny house.
That’s where tankless water heaters come in. These innovative systems provide hot water on demand, heating the water as it flows through the unit. This means that you’ll never run out of hot water, and you won’t be wasting energy on keeping a large tank of water heated all the time.
Tankless water heaters are compact and can easily be installed in your tiny house bathroom, saving you valuable space. With their efficient design, they can provide hot water whenever you need it, without the need for a storage tank.
So, when it comes to water heaters for your tiny house, consider the benefits of a tankless system for efficient hot water and minimal waste water.
Maintenance Tips for Tiny House Bathroom Plumbing
Regular inspections, cleaning, and sanitizing are essential for maintaining the plumbing in your tiny house bathroom. By conducting regular inspections, you can identify any potential issues or leaks before they become major problems.
Cleaning and sanitizing your plumbing fixtures regularly will help prevent the buildup of bacteria and ensure that your bathroom remains hygienic and functional. Remember to prioritize these maintenance tasks to keep your tiny house bathroom plumbing in top shape.
Regular Inspections
Make sure you inspect your tiny house bathroom plumbing regularly to check for leaks and damage, ensuring efficient installation. Regular inspections are crucial in maintaining the overall functionality of your plumbing system.
Start by checking the water tank for any signs of leakage or cracks. A leaking water tank can lead to water wastage and potential damage to your tiny house.
Additionally, inspect the septic tank to ensure it’s properly sealed and functioning correctly. Any issues with the septic tank can result in unpleasant odors and sewage backup, causing major inconveniences.
By conducting regular inspections, you can identify and address any potential problems before they escalate into costly repairs or replacements.
Cleaning and Sanitizing
To maintain a hygienic and eco-friendly environment, it’s crucial to incorporate efficient cleaning and sanitizing practices into your bathroom routine in a tiny house. With limited space and resources, it becomes even more important to make the most out of every drop of water.
Here are some essential tips to keep your tiny house bathroom clean and sanitized:
Use fresh water wisely: In a tiny house, water is a precious resource. Use it efficiently by turning off the faucet when not in use and opting for low-flow fixtures. Consider collecting and reusing greywater from sinks and showers for non-potable purposes such as watering plants or flushing toilets. This way, you can minimize water wastage and reduce your environmental impact.
Properly dispose of black water: When it comes to waste disposal, it’s crucial to handle black water appropriately. Install a composting or low-flush toilet system that can efficiently break down waste without the need for excessive water usage. Regularly empty and maintain the system to prevent any odors or unsanitary conditions. Remember to follow local regulations and guidelines for the disposal of black water to ensure proper sanitation and environmental protection.
Keep surfaces clean and sanitized: In a small space like a tiny house bathroom, it’s essential to keep surfaces clean to prevent the spread of germs and maintain a hygienic environment. Use eco-friendly cleaning solutions such as vinegar, baking soda, or hydrogen peroxide to clean toilets, sinks, and showers. These natural alternatives are effective and safe for both you and the environment. Regularly sanitize high-touch areas like doorknobs, faucets, and toilet handles to minimize the risk of contamination.
By incorporating these efficient cleaning and sanitizing practices into your tiny house bathroom routine, you can maintain a hygienic environment while minimizing your water usage and environmental impact. Remember to use fresh water wisely, properly dispose of black water, and keep surfaces clean and sanitized. With these tips, you can enjoy a clean and eco-friendly bathroom experience in your tiny house.
Maintenance Tips for Tiny House Bathroom Plumbing
When it comes to maintaining your tiny house bathroom plumbing, it’s important to keep in mind that prevention is key. Regular maintenance can help prevent costly repairs and ensure that your plumbing system operates efficiently.
One important area to focus on is the gray water system. Make sure to regularly clean and inspect the pipes and drains to prevent clogs and backups. It’s also a good idea to periodically flush the gray water tank to remove any buildup or debris. Additionally, don’t forget to check the seals and gaskets to ensure they’re in good condition and replace them if necessary.
Another important aspect of maintenance is the fresh water tank. Regularly clean and sanitize the tank to prevent the growth of bacteria and maintain the quality of your water. You can use a mixture of bleach and water to thoroughly clean the tank, and make sure to rinse it thoroughly afterwards.
It’s also important to regularly inspect the tank for any leaks or damage, and address any issues immediately. Lastly, don’t forget about the black water tank. Regularly empty and clean the tank to prevent odors and backups. Use appropriate chemicals to break down waste and control odors, and make sure to follow the manufacturer’s instructions.
By following these maintenance tips for your tiny house bathroom plumbing, you can ensure the longevity and efficiency of your system.
Conclusion
So there you have it, my friend. You’ve now reached the end of this insightful article on tiny house bathroom plumbing.
You’ve learned about the basics, seen diagrams, and even planned your own installation. You’ve gained knowledge on the water supply system, drainage system, insulation, and winterization.
But wait, there’s more! You’ve also discovered the essential components and received valuable maintenance tips.
Now, armed with this newfound wisdom, you’re ready to take on the world of tiny house bathroom plumbing. Just remember to keep your pipes flowing smoothly and your drains clear. And don’t forget to insulate and winterize, because who wants freezing pipes in the middle of winter? Not you, my friend.
So go forth, my fellow tiny house dweller, and conquer the world of plumbing. You may have a small space, but with the right knowledge and a touch of satire, you can navigate the intricate world of tiny house bathroom plumbing with ease. Good luck, and may your showers be warm and your toilets never clog!