

Are you want to build your own tiny house but don’t know where to start? One of the most important parts of building a tiny house is the roof framing and sheathing wrap. This is where you will need to pay attention to the details to ensure that your tiny house is structurally sound, weatherproof, and energy-efficient.
In this article, we will guide you through the basics of tiny house roof framing and sheathing wrap. We will explain what roof framing is, the materials and tools you will need, and the most common types of roof framing plans. We will provide you with a step-by-step guide on how to frame a tiny house roof. Additionally, we’ll give you an idea of how much it will cost you.
By the end of this article, you will have all the information you need. You will be able to build a strong and sturdy roof for your tiny house.
Contents
- 1 What is roof framing?
- 2 Tiny House Roof Framing Basics
- 3 How to framing a tiny house roof: A step-by-step guide
- 4 How to Framing a tiny house roof: A step-by-step guide
- 5 What type of materials and tools used for roof framing?
- 6 What is the most common tiny house roof framing Plan?
- 7 Some Different Types of tiny house Roof Framing
- 8 How much does tiny house roof framing cost?
- 9 Conclusion
What is roof framing?
Roof framing is simply building the structure that supports the roof. It’s an essential step in the construction process of a tiny house.
The framing must be strong to withstand the weight of the roof and the elements it will face. The framing also offers essential support for the later installation of the roof sheathing.
When it comes to tiny house roof framing, the process isn’t much different from framing a regular-sized house. The main difference is the size of the structure. Since tiny houses are smaller, the amount of lumber used in framing is also reduced. However, Ensuring strength and stiffness is important to effectively support the weight of the roof.
ce the framing is complete, the next step is to install the roof sheathing. This is the layer of material that covers the framing and provides a base for the roofing material. The sheathing also helps to prevent moisture from entering the house. It’s usually made of plywood or oriented strand board (OSB) and is attached to the framing with nails or screws.
With the framing and sheathing complete, the tiny house is now ready for the next stage of construction.
In the next section about tiny house roof framing basics. we move on to understanding the different types of roof designs used in tiny house construction.
Tiny House Roof Framing Basics

As you approach the upper part of your dwelling, familiarize yourself with the fundamental principles. Construct a sound and solid structure that can withstand the elements. Tiny house roof framing is an essential part of building a tiny house that will keep you safe and comfortable.
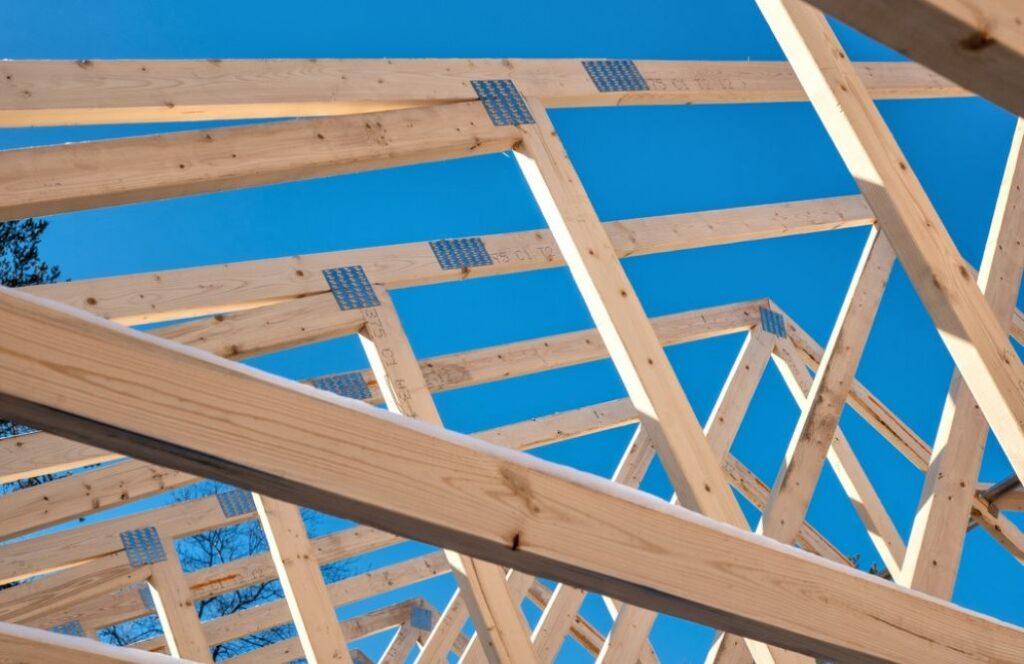
The roof framing includes the ridge beam, rafters, and roof pitch. They all play a critical role in supporting the weight of your roof and protecting you from the elements. The ridge beam is the center beam of the roof that runs from one end of the roof to the other. It provides support for the rafters, which are the sloping beams that make up the roof’s structure. The rafters attach to the ridge beam at the top and to the walls of the tiny house at the bottom. The roof pitch, or angle of the roof, gets determined by the length of the rafters and the height of the ridge beam.
The sheathing wrap is an important part of the roof framing process. It is a layer of material that place over the rafters and under the roofing material. The sheathing wrap provides a barrier against moisture, which can cause rot and mold. It also helps to make the roof more energy-efficient by reducing heat loss.
By understanding the basics of tiny house roof framing and sheathing wrap. you can ensure the safety, comfort, and energy efficiency of your tiny house. As you move on to the next section about framing a tiny house roof, you’ll learn the step-by-step guide. It will help you construct a solid roof for your tiny house. By following these steps, you can ensure that your roof will be strong, durable, and able to withstand the elements.
How to framing a tiny house roof: A step-by-step guide
You’re about to embark on a step-by-step guide that will guide you through the process of constructing a sturdy and secure roof for your cozy abode.
The first step in framing a tiny house roof is to install the ridge board, which is a horizontal beam that runs along the peak of the roof. The ridge board should be sized according to the dimensions of your tiny house.
Next, it’s time to install the roof rafters. These are the sloping beams that support the roof sheathing and shingles. Cut the roof rafters to the correct length and angle, and then secure them to the ridge board and the top plate of the walls. Ensure that you space the roof rafters evenly and securely fasten them to the walls.
Once the roof rafters are in place, you can begin to install the sheathing wrap. This is a layer of plywood or oriented strand board that covers the entire roof surface and provides a flat, even surface for the shingles. Attach the sheathing wrap to the roof rafters using screws or nails, and then cover it with roofing felt or another moisture barrier.
With the sheathing wrap in place, your tiny house roof is ready for the next step in the construction process.
How to Framing a tiny house roof: A step-by-step guide
If you’re planning to build a tiny house, you’ll need to know how to frame a roof. The process involves designing a roof frame, cutting the rafters, and raising the rafters into place.
With these key points in mind, you’ll be able to successfully construct a strong and sturdy roof for your tiny house.
Design a Roof Frame
When designing a roof frame for your tiny house, you need to make several key decisions. First, you should choose a style of roof that fits your aesthetic preferences and functional needs.
Then, you’ll need to select the design of roofing trusses. Additionally, you should understand the different measurements. you’ll need, including using a construction calculator for rafter measurements.
Choosing a Style of Roof

Deciding on the perfect roof style can make all the difference. It creates a cozy and inviting space for your tiny house roof framing and sheathing wrap.
When choosing a style of roof, there are many options to consider, such as shed roof rafters or a flat roof truss. Each style has its own benefits and drawbacks, so it’s essential to weigh the pros and cons carefully.
A shed roof rafter is a simple and cost-effective option that provides excellent drainage and allows for additional space in your loft. On the other hand, a flat roof truss is a more modern and sleek option. It provides a larger usable space but requires a more complex design to ensure proper drainage.
Ultimately, the choice of roof style will depend on your personal preference and the specific needs of your tiny home.
Now, let’s move on to selecting the design of roofing trusses.
Selecting the Design of Roofing Trusses

Now it’s time for you to choose the perfect design for your roofing trusses. Create a stunning and functional roof that will make you feel proud of your tiny house.
The design of your trusses depends on the style of roof you chose previously. It also depends on the specific measurements of your roof framing and sheathing. There are many different designs to choose from, including king post, queen post, scissor, and mono trusses.
Each design has its own advantages and disadvantages, So it’s important to consider your priorities, such as maximizing headroom or minimizing materials and costs. Once you’ve selected your design, you can work with a professional. Or, you can use a software program to calculate the exact measurements you’ll need for each truss.
Understanding the Different Measurements You’ll Need

Understanding the various measurements needed is crucial. It ensures the structural integrity and proper sheathing of your chosen truss design for your tiny house roof framing.
When it comes to measuring your roof structure, you’ll need to consider a few different measurements. These include the span of the roof, the pitch or angle of the roof, and the spacing of the framing members. These measurements will all impact the design of your trusses and the amount of sheathing wrap needed to cover the roof.
Once you have a solid understanding of these measurements, you can move on to using a construction calculator for rafter measurements. This will help you make sure you have the correct dimensions for your framing members.
With all of these measurements in mind, you’ll be well on your way to creating a sturdy and secure roof.
Using a Construction Calculator for Rafter Measurements
Utilizing a construction calculator for rafter measurements can assist in ensuring accurate dimensions. These dimensions are necessary for constructing a robust and secure roof for your tiny house roof framing and sheathing wrap. This tool can help you quickly and easily calculate the length and angle of your rafters based on the pitch of your roof.
With the right measurements, you need to ensure that your roofing materials fit correctly and that your roof is stable and secure. you can move on to determining the number of rafters needed for your tiny house roof framing and sheathing wrap.
Determining the Number of Rafters Needed

Space the rafters 16-24 inches apart. It ensures building a strong and stable roof that will protect your tiny house roof framing from the elements. The number of rafters you need will depend on the size and design of your roof, as well as the spacing you plan to use.
Generally, rafters are spaced 16-24 inches apart, but this can vary depending on your sheathing and roof design. To determine the number of rafters needed, you need to measure the length of your roof along the ridge and divide it by the spacing between your rafters. This will give you the total number of rafters required.
Now calculate the number of rafters, you can move on to considering prefabricated trusses!
Considering Prefabricated Trusses
When considering your options for roof construction, you may want to explore the benefits of utilizing prefabricated trusses.
Prefabricated trusses are pre-assembled roof structures that come in various shapes and sizes, providing a convenient and efficient option for roof framing. They save time and labor in the construction process. They also offer improved structural integrity and the ability to support heavier loads compared to traditional roof rafters.
Additionally, prefabricated trusses can provide better insulation and ventilation. These are crucial for maintaining a comfortable living environment in your tiny house. By using it, you can also simplify the installation of your sheathing wrap and move on to cutting the rafters with ease.
Cutting the Rafters
Now that you’ve designed your roof frame, it’s time to cut the rafters.
This subtopic will cover key points such as understanding rafter cuts and angles. It will also cover measuring and marking rafter cuts, as well as using power tools for rafter cutting.
You’ll need to pay close attention to these details to ensure your roof is structurally sound and fits correctly on your tiny house.
Understanding Rafter Cuts and Angles

You’ll need to grasp the geometry of rafter cuts and angles to get a grip on the grooves of tiny house roof framing.
Rafter cuts and angles refer to the structural components that form the roof’s frame.
Learning how to cut these correctly is essential for a sturdy and safe roof.
The cuts and angles you’ll be dealing with include the plumb cut, bird’s mouth cut, seat cut, and cheek cut, among others.
Understanding these cuts and angles is crucial. It ensures proper support for the roof and secure installation of the sheathing wrap.
Once you have a good understanding of rafter cuts and angles, you can move on to measuring and marking them accurately.
Measuring and Marking Rafter Cuts

Measuring and marking rafter cuts may seem intimidating at first. However, with these simple tips, you’ll be able to confidently create precise cuts. This will ensure your tiny house roof framing is safe and secure.
Begin by measuring the width and depth of your rafters. Then, use a framing square to mark the cuts on the lumber. Make sure to double-check your measurements before making any cuts.
When marking the angles, use a protractor or angle finder to ensure accuracy. Once all cuts are marked, use a handsaw or circular saw to make the cuts. Don’t forget to label each rafter with its corresponding location on the roof.
With these steps, you’ll be well on your way to completing the sheathing wrap on your tiny house roof.
Next, we’ll discuss using power tools for rafter cutting.
Using Power Tools for Rafter Cutting
Using power tools is a faster and more efficient way to cut rafters when framing a tiny house roof. When operating power tools, it’s important to follow safety guidelines. This includes wearing protective gear and using the proper technique. Before cutting, make sure to double-check your measurements to ensure accurate cuts.
Use a circular saw or a miter saw to make the cuts, depending on the tool that you’re comfortable using. When cutting, be mindful of the direction and angle of the blade to avoid splintering or damaging the lumber. Once the rafters are cut, it’s time to move on to raising them for installation onto the sheathing wrap.
Raising the Rafters
Now that you’ve cut the rafters, it’s time to move on to raising them.
This involves lifting the ridge board into place and measuring and marking cap plates for each rafter. Additionally, it involves installing the rafters on wall plates.
Once the rafters are in place, you’ll need to set and brace each one, plumb them out, install sub-fascia boards, and finally, install the roof sheathing.
Lifting the Ridge Board into Place
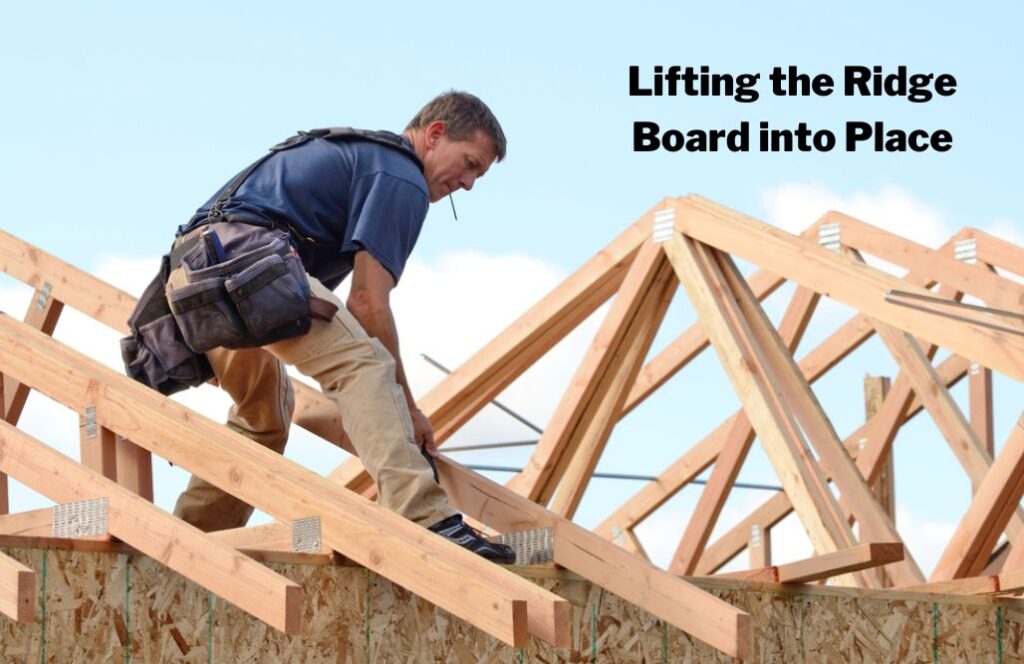
Once you’ve gathered your materials and enlisted a helper, it’s time to hoist the ridge board into place for the tiny house roof framing.
The ridge board will serve as the central support beam for the roof, and it’s important to ensure that it’s level and centered.
With the help of your assistant, carefully lift the ridge board onto the walls and secure it in place.
After securing the ridge board, proceed to the next installation step.
Measure and mark cap plates for each rafter. This step is crucial for ensuring that your tiny house roof framing is precise and accurate, so take your time and measure twice before making any cuts.
With the ridge board installed and the cap plates marked, you’re one step closer to completing the sheathing and building the roof of your tiny house.
Measuring and Marking Cap Plates for Each Rafter
You’re ready to take the next step in creating a strong and sturdy roof for your cozy abode by measuring and marking each cap plate for every rafter.
This is an important step in the tiny house roof framing process. It ensures precise and accurate placement of the rafters, which will ultimately support the sheathing wrap and provide protection from the elements.
To begin, measure and mark the cap plates for each rafter, taking care to ensure that the measurements are correct and consistent.
Once you’ve marked all of the cap plates, move on to installing the rafters on the wall plates. This will bring you one step closer to completing your tiny house roof framing project.
Installing Rafters on Wall Plates
Installing the rafters onto the wall plates is a crucial step in ensuring the stability and durability of your tiny house roof framing. Before you begin, it’s important to consider the weight distribution and load-bearing capacity of your design.
Make sure to use the appropriate roofing materials that can support the expected weight and stress. When installing rafters, it’s important to ensure that they are level and spaced evenly. Secure each rafter to the wall plate with nails or screws and double-check for any gaps or misalignments.
After installation, Now it’s time to move on to setting and bracing each rafter to ensure they remain in place.
Setting and Bracing Each Rafter
Get ready to secure and stabilize your roof by setting and bracing each rafter as a crucial step in tiny house roof framing. To begin, place each rafter on its corresponding wall plate and secure it with hurricane ties or metal brackets.
Use a level to ensure that each rafter is straight, then brace it with temporary supports until you’ve installed all the rafters. This will prevent any movement or shifting during the installation of the plywood sheathing wrap.
Once all the rafters are set, you can proceed to brace each one by adding diagonal supports to create a stable structure.
After bracing your rafters, it’s time to install the plywood sheathing. Remember to stagger the seams of the sheathing to provide additional strength to your tiny house roof framing.
With the sheathing installed, you can plumb out the rafters and install sub-fascia boards to prepare for the next stage of your tiny house build.
Plumb Out the Rafters and Install Sub-Fascia Boards
Now secure and brace the rafters, it’s time to focus on the final details that will ensure a strong and stable roof for your tiny home.
The next step is to plumb out the rafters and install sub-fascia boards. This will involve making a plumb cut at the top of each rafter to ensure that they are straight and vertical.
Once this is done, you can install the sub-fascia boards. They will provide a solid nailing surface for the roof sheathing. Cut the sub-fascia boards to the same length as the rafters and nail them in place using galvanized nails.
With the sub-fascia boards in place, you can move on to installing the roof sheathing.
Installing the Roof Sheathing

You’re ready to add another layer of protection to your tiny house roof framing by installing the roof sheathing.
This involves attaching large sheets of plywood to the rafters, providing a solid base for the roofing material to be installed on top of.
To begin, make sure the rafters are plumb and evenly spaced.
Then, starting at the bottom edge of the roof, lay the first sheet of plywood horizontally and nail it into place using framing nails.
Continue placing and nailing the remaining sheets, making sure to stagger the seams for added strength.
Once you install all the plywood, you can move on to the next step of determining what type of materials and tools used for roof framing.
What type of materials and tools used for roof framing?
The carpenter’s toolbox fill with various saws, hammers, and nails. These tools were essential in building the foundation of their dream home’s protective shield.
When it comes to tiny house roof framing, there are several materials and tools that you’ll need to ensure a sturdy and secure roof. The materials for roof framing generally include wood beams, plywood sheets, and metal brackets. You’ll also need a circular saw, framing hammer, framing nail gun, and a speed square to ensure accurate cuts and measurements.
Also to the materials and tools for roof framing, you’ll also need to consider the roof sheathing wrap. This is a type of moisture barrier that installs underneath the roof shingles. Its purpose is to prevent water damage and improve insulation. There are several types of roof sheathing wrap available, including asphalt felt paper and synthetic felt. The material should depend on the climate and weather conditions in your area, as well as your budget.
What is the most common tiny house roof framing Plan?
When it comes to tiny house roof framing, there are a few different plans you can choose from. The most common ones include the gable roof framing plan, hip roof framing plan, gambrel roof framing plan, and mansard roof framing plan. Another common option is the shed roof framing plan.
You’ll want to consider which one will work best for your needs.
Gable roof Framing plan
As you envision the peak of your dream home’s triangular rooftop, imagine the intricacies involved. They are involved in crafting the perfect gable roof framing plan.
The gable roof is one of the most common tiny house roof framing plans, characterized by two sloping sides that meet at the ridge or peak of the roof. With this plan, the roof framing forms a triangular shape, which is easy to construct and provides ample space for a loft or additional storage.
To begin the framing process, you’ll need to install the ridge beam, which is the centerline of the roof. Then, you can attach the rafters, which are the sloping sides of the roof that connect to the ridge beam.
The next step is to install the roof sheathing. This layer of material covers the roof framing and provides a base for the roofing material. With the gable framing plan, you have the option to use a variety of materials, including shingles, metal panels, or even living roofs.
As you move on to the hip roof framing plan, you’ll discover a new set of challenges and possibilities to consider.
Hip roof Framing plan
You’re about to explore a new roofing plan that creates a more dynamic shape, with four sloping sides that meet at a ridge, resembling a pyramid. This is the hip roof framing plan, a popular choice for tiny house roof framing.
The hip roof style provides more stability than the gable roof framing plan, making it ideal for regions with high winds or heavy snow loads. The hip roof framing plan is constructed with rafters that attach to a ridge board at the top and sit on top of the exterior walls at the bottom. The rafters are cut at an angle to match the slope of the roof.
The next step is to apply sheathing wrap to the top of the roof. This provides extra support and prevents water from seeping into the house. With hip roof framing, you’ll have a strong and durable roof that will last for years to come.
Moving on to the next section about the gambrel roof framing plan. Here, you’ll discover another unique roofing style that’s perfect for tiny homes.
Gambrel roof Framing plan
Now that you’ve learned about the hip roof framing plan, let’s take a look at another popular roof design for tiny houses – the gambrel roof. This style is often seen on barns and gives a unique look to a tiny house.
The gambrel roof is a two-sided roof that has two slopes on each side. The bottom slope is steeper than the top slope, which creates more headspace on the upper level of the house. To frame a gambrel roof, you will need to use a timber frame that is slightly different from a hip roof.
The frame will have two angled sides that meet at the peak and two flat sides that create the upper level’s floor. Once the frame is complete, you can begin to install the roof sheathing and roofing materials. The roof sheathing is crucial for providing a stable base for the roofing materials and helps to protect the interior from water damage.
With the gambrel roof, you will have more space for insulation, so be sure to use high-quality materials to keep your tiny house warm and dry. As you can see, the gambrel roof is an excellent option for tiny houses, and it offers a unique look that sets your home apart. But if you’re looking for a different roof design, the mansard roof framing plan might be just what you need.
Mansard roof Framing plan
The Mansard roof framing plan offers a unique style option. It is perfect for those looking for something different in their tiny house roof framing design. This type of roof has a flat top with two slopes on each side, creating a steep pitch at the bottom and a shallower slope near the roof peak. This design allows for more usable space in the upper levels of the tiny house. It is a popular choice for those looking to maximize their living area.
When framing a tiny house roof with a Mansard design, one must ensure the proper installation of the sheathing wrap. This is important to prevent leaks and damage. The sheathing wrap should be installed over the roof framing and under the roofing material to provide a waterproof barrier.
With careful planning and attention to detail, the Mansard roof framing plan can provide a beautiful addition to any tiny house design. It also offers functionality and versatility. Moving on to the next section about the shed roof framing plan, you can explore another popular option for your tiny house roof.
Shed roof Framing plan
If you’re looking to add a touch of modern simplicity to your tiny house design, the shed roof framing plan could be the perfect choice for you. The shed roof is a single sloping roof that’s simple and easy to build. It’s also a popular choice for tiny houses because it provides more headroom and allows for a loft or second-story space.
When it comes to framing a shed roof, the process is straightforward. The framing plan involves building a simple rectangular frame, attaching the rafters at the top, and securing them to the wall plates. Once the roof framing is complete, you can then add the sheathing wrap to protect the roof from the elements.
This is just one of the many different types of tiny house roof framing plans you can choose from, depending on your design preference.
Some Different Types of tiny house Roof Framing
If you want to explore different tiny house roof framing plans, there are a variety of options to choose from. You could consider a skillion or lean-to roof framing plan, which is great for shedding water and is easy to build.
Another option is a dormer roof framing plan, which adds extra headroom and natural light to your loft space.
Skillion and lean-to Roof Framing
Take a closer look at how you can create a unique and modern angle with your roof design. Explore the skillion and lean-to options for your tiny house roof framing plan.
A skillion roof framing plan is a single-sloping roof that’s ideal for those who want to maximize the natural light in their homes. This type of roof is perfect for those who want a minimalist and contemporary look.
Meanwhile, a lean-to roof framing plan is also a single-sloping roof but is attached to an existing structure like a wall or a garage. This type of roof is perfect for those who want to add an additional room or space to their homes.
Both skillion and lean-to roof framing plans require the same process when it comes to sheathing wrap. You need to install the sheathing wrap over the roof framing before installing the roofing materials. Sheathing wrap is essential as it provides a barrier against moisture and wind.
Proper installation of sheathing wrap will ensure that your roof structure is protected and will last for a long time.
Now that you’ve learned about skillion and lean-to roof framing plans and sheathing wrap, it’s time to move on. The next section is about the dormer roof framing plan.
Dormer Roof Framing
Now you’re going to learn how to add more space and character to your tiny house roof design with a dormer roof framing plan. Dormers are small structures that project from a sloping roof, providing extra headroom and natural light to the interior. They add an interesting architectural detail that can enhance the overall look of your tiny house.
To frame a dormer roof, you’ll need to create a rough opening in the main roof, build the dormer walls and roof, and then attach them to the main roof frame. Use the same roof framing techniques you learned for the skillion and lean-to roof plan. However, adjust the measurements for the size and shape of your dormer.
Once the framing is complete, install the sheathing wrap and roofing materials to weatherproof the roof. With a dormer roof framing plan, you can create a unique and functional living space in your tiny house.
Next up is the mansard roof framing plan, which is another way to add more space to your tiny house.
Mansard Roof Framing
The mansard roof framing plan offers an innovative way to expand the living space in your tiny house while adding a unique aesthetic appeal. This type of roof features two slopes, with the lower slope being steeper than the upper slope. This design allows for additional living space in the upper level of the house. It is perfect for those who want to maximize every inch of their tiny home.
When framing a tiny house roof with a mansard design, it’s essential to ensure that the roof framing is sturdy. It should be able to support the weight of the roof sheathing wrap and any snow or ice that may accumulate. With the right materials and proper installation, your tiny house roof will be able to withstand the elements and keep you safe and warm.
Next, let’s discuss the butterfly roof framing plan, which is another popular option for tiny house owners.
Butterfly Roof Framing
If you’re looking for a unique and stylish way to frame your abode’s top, the butterfly roof plan might just be the bee’s knees. This type of tiny house roof framing is perfect for those who want to deviate from the traditional flat roof or shed style roof.
The butterfly roof consists of two slopes that meet at the center of the roof, forming an inverted V-shape. This design allows for a higher ceiling on the inside of the house, creating an illusion of more space. To build a butterfly roof, you’ll need to consider the wall framing and make sure it can support the weight of the roof.
The roof framing will require a ridge beam and rafters to create the V-shape. Once the framing is complete, you’ll need to install sheathing wrap to protect the roof from moisture. The butterfly roof is an excellent option for tiny houses. It maximizes the interior space while still providing adequate protection from the elements
Now, let’s move on to the next section about the jerkinhead roof framing plan.
Jerkinhead Roof Framing
Looking for a way to add some character to your tiny house roof framing plan? Consider incorporating the jerkinhead roof framing plan!
This design is a variation on the traditional gable roof, where the roof meets at a peak and slopes downward on either side. With the jerkinhead plan, the two sloping sides are shortened and meet at a point that is then topped with a small gable or hip roof. This creates a unique and interesting look to your tiny home’s roof design.
When implementing the jerkinhead roof framing plan, it’s important to keep in mind the desired pitch of your roof. A steeper pitch will require more materials and may not be suitable for your tiny home’s size. A flatter pitch may not provide enough slope for proper water runoff.
Additionally, make sure to install the sheathing wrap properly to protect your roof from moisture and other weather elements. With this design, you’ll have a roof that not only looks great but also functions well.
Moving on to the next section, let’s take a look at the flat roof framing plan.
Flat Roof Framing
Get ready to explore the sleek and modern style of the flat roof framing plan! This type of roof is becoming popular among enthusiasts for its simplicity and low maintenance.
The key to a successful flat roof framing is to ensure that the exterior walls are strong enough to support the weight of the roof. After placing the walls, the construction team installs gable end rafters to support the roof structure.
One important thing to keep in mind when installing a flat roof is to use tar paper as a moisture barrier. This will protect the roof from any potential leaks that may occur over time.
Once the tar paper is in place, the sheathing can be installed to provide a solid base for the roofing material. With the flat roof framing plan, you’ll have a modern and practical solution that will complement your tiny house design perfectly.
As you move onto the next section about the ‘cross hipped roof framing plan,’ remember that each type of roof has its own unique advantages and disadvantages. It’s important to consider your individual needs and preferences before choosing a roof design for your tiny house.
Cross Hipped Roof Framing
The cross hipped roof framing plan is a versatile option for those seeking a roof design that resembles a butterfly spreading its wings. This type of framing plan is commonly used in tiny house roof framing because it allows for more headroom and space for storage.
The cross hipped roof framing plan consists of four rafters that run diagonally from the ridge to the corners of the house. The sheathing wrap is then applied over these rafters to provide a solid base for the roof. The ridge beam is also an important component of the cross hipped roof framing plan. It’s the highest point of the roof and serves as the main support for the rafters.
The roof is then covered with either metal or shingles, depending on the preference of the homeowner. With the cross hipped roof framing plan, you can enjoy a unique and functional roof design that will make your tiny house stand out.
As you move onto the next section about the “m shaped roof framing plan,” you’ll learn about another option for tiny house roof framing.
M Shaped Roof Framing
Now that you’ve got a good understanding of the cross hipped roof framing plan for your tiny house. It’s time to explore another option: the M-shaped roof framing plan.
This type of roof is a bit more complex to construct, but it can give your tiny house a unique look and provide extra space in the attic area.
When framing a curved roof for a tiny house, it’s important to be precise with your measurements and cuts. You’ll need to create a solid base for your roof deck framing, which will include a ridge beam and rafters.
Once that’s in place, you can begin framing the curved sections of the roof. After the framing is complete, you’ll need to sheath the roof with materials such as plywood or OSB before adding the metal roofing.
The end result will be a durable and stylish roof that will protect your tiny house for years to come.
As you move on to the next section about saltbox roof framing plan, keep in mind that this style of roof is simpler to build than the M shaped roof. However, it still requires attention to detail and careful planning to ensure that your tiny house is structurally sound.
Saltbox Roof Framing
If you’re looking for a simpler alternative to the M shaped roof framing plan for your tiny house, the saltbox roof framing plan may be just what you need. This design features a single slope on one side and a longer slope on the other, creating an asymmetrical look that adds visual interest to your home.
The saltbox roof is also easier to construct than the M shaped roof, making it a great option for those who are new to advanced framing techniques. To construct a saltbox roof, you’ll need to start with a ridge beam that runs the length of your tiny house. This beam will support the weight of the roof and create the angle of the two slopes.
From there, you can attach your roof rafters and sheathing wrap. With the right tools and materials, you can complete the construction of your saltbox roof in no time.
Now, let’s move on to the next section where we’ll discuss the combination roof framing plan.
Combination Roof Framing
When it comes to framing and sheathing your tiny house roof, you’ll want to consider a combination roof plan.
One option is the pyramid hip roof, which is a popular choice due to its simple design and efficient use of space.
By using this type of framing plan, you can ensure a sturdy and functional roof for your tiny home.
Pyramid hip Roof Framing
Well, looks like we’ve got ourselves a little pyramid party going on here with all these angled lines and geometric shapes. The pyramid hip roof framing plan is a popular choice for tiny house roof framing. It provides excellent stability and support for the structure.
The rafters are cut at angles and meet at a central point, creating a four-sided pyramid shape. This design allows for efficient water drainage and helps to prevent any potential leaks. The gable ends of the roof are framed in a triangular shape, which adds to the overall structural integrity.
Once the pyramid hip roof framing is complete, the next step is to add the sheathing wrap. The sheathing wrap is a protective layer that helps to prevent moisture from penetrating the roof system. With all these details, it’s no wonder that tiny house roof framing can be quite expensive.
Transitioning to the next section, let’s explore how much it costs to frame a tiny house roof.
How much does tiny house roof framing cost?
You’ll be pleasantly surprised at how affordable it is to create a sturdy and secure roof for your cozy tiny house. The cost of tiny house roof framing largely depends on the size and style of your house.
For instance, a shed style roof will require less material than a pyramid hip roof framing plan. Nevertheless, you can expect to spend anywhere between $500 and $2000 on tiny house roof framing.
When it comes to tiny house roof framing, steel is a great option for those who want a durable and long-lasting structure. Steel framing is lightweight, fire-resistant, and can withstand harsh weather conditions. Additionally, steel framing is easy to work with, making it a great option for DIYers. But, if you prefer wood framing, you can still achieve a sturdy and secure roof. Just make sure to use high-quality lumber and follow proper building codes.
Once you have completed your tiny house roof framing, it’s time to install the sheathing wrap. This is an essential step in keeping your tiny house dry and protected from the elements. The cost of sheathing wrap will depend on the size of your tiny house and the type of material you choose.
Typically, you can expect to spend between $150 and $500 on sheathing wrap. With a sturdy roof framing and durable sheathing wrap, your tiny house will be well-protected for years to come.
As you wrap up the topic of tiny house roof framing and sheathing wrap. It’s important to remember that the cost of these materials and processes depends on your individual needs and preferences. By doing your research and carefully planning your tiny house build. you can create a cozy and comfortable home that fits your budget and lifestyle.
If you are looking for a complete guide – with our Tiny House Roof Framing Cost, you will be get an estimate to build your dream home
Conclusion
Congratulations! You now have a fully framed and sheathed tiny house roof! You may feel like you’ve hit the nail on the head but don’t forget that this is just the beginning of the construction process.
Remember, Rome wasn’t built in a day and neither will your tiny house. You may encounter some bumps in the road but don’t throw in the towel just yet. Keep your eyes on the prize and continue to work diligently.
As the saying goes, ‘Slow and steady wins the race.’ Take your time and be patient, the end result will be worth it.