

Planning to build your own tiny house? Having the right tools is essential for a successful and efficient construction process. From layout and measuring to framing and finishing, each step requires specific tools. These tools are designed to make your job easier and more precise.
In this buying guide, we will break down the most essential framing tools you need for building a tiny house. We’ll provide you with a comprehensive list to help you plan whether to borrow, rent, or buy.
When it comes to layout and measuring, accuracy is crucial for the success of your tiny house project. You will need tools such as a tape measure, framing square, level, and chalk line. These tools ensure your measurements are precise and your layout is straight and square. These tools will help you establish the foundation of your tiny house and ensure that each subsequent step aligns correctly.
Additionally, having a good set of hand tools is essential for various tasks, including cutting, nailing, and fastening. A claw hammer, utility knife, chisels, and a set of screwdrivers are some of the basic hand tools you will need to have in your arsenal. These tools will allow you to work efficiently and accurately. They ensure that each joint and connection is secure and well-crafted.
Contents
Tools Needed To Build A Tiny House – Plan To Borrow, Rent Or Buy
If you’re planning to build a tiny house, you’ll need to decide whether to borrow, rent, or buy the essential framing tools. Having the right tools is crucial for a successful construction project, and it’s important to consider your options before making a decision.
One option is to borrow the tools from friends, family, or neighbors who may already have them. This can be a cost-effective solution, especially if you only plan to use the tools for a short period of time. However, keep in mind that borrowing tools may come with limitations, such as availability and the need to return them promptly.
Another option is to rent the tools needed to build a tiny house. Many hardware stores and equipment rental companies offer a wide range of tools for rent. This includes those specifically designed for tiny house construction. Renting can be a good choice if you don’t want to invest in purchasing the tools outright or if you only plan to use them for a limited time. However, it’s important to factor in the rental costs. Consider whether it would be more cost-effective to buy the tools if you anticipate using them for an extended period or for future projects.
Buying the essential framing tools for your tiny house is the most convenient option if you have the budget. This is especially true if you foresee using them for multiple projects. By purchasing the tools, you have the freedom to use them whenever you need without any time constraints or rental fees. It also allows you to familiarize yourself with the tools and develop a sense of ownership. This ensures that you have the right equipment readily available whenever you’re ready to build. Additionally, purchasing the tools gives you the opportunity to invest in high-quality, durable tools. These tools will last for years and provide better results in your construction endeavors.
Layout & Measuring For Tiny House

When it comes to layout and measuring for your tiny house, there are several key tools that you’ll need.
First and foremost, a reliable tape measure is essential for accurately measuring dimensions and distances.
A speed square is also crucial for ensuring precise angles and making square cuts.
Additionally, a string line and chalk line are helpful for establishing straight lines and layout reference points.
Lastly, a level is necessary for checking the horizontal and vertical alignment of your structure.
Tape Measure
Did you know that the average tape measure is used over 2,000 times during the construction of a tiny house? That’s how essential this tool is in the framing process.
A tape measure is used to accurately measure and mark the dimensions of various components, such as walls, windows, and doors. It allows you to ensure precise cuts and placements, resulting in a well-structured and sturdy tiny house.
When selecting a tape measure for your framing needs, there are a few key features to consider. Look for a tape measure with a durable and reliable locking mechanism that securely holds the tape in place. This will prevent any accidental retraction and ensure accurate measurements.
Additionally, opt for a tape measure with a wide and sturdy blade. This will make it easier to measure longer distances without the blade bending or collapsing. Lastly, a tape measure with clear and easy-to-read markings is essential for quick and efficient measurements. Look for a tape measure with both imperial and metric units. This will allow you to work with different measurement systems depending on your needs.
A tape measure is a vital tool in the framing process of building a tiny house. Its accurate measurements and markings will ensure precision and accuracy throughout the construction. When choosing a tape measure, prioritize features like a reliable locking mechanism, a sturdy blade, and clear markings. These enhancements will improve your framing experience.
With a high-quality tape measure in hand, you’ll be well-equipped to tackle intricate measurements. These measurements are required for a successful tiny house construction.
Speed Square
Get ready to level up your framing game with the indispensable tool known as a Speed Square. This square-shaped tool is a must-have in your tool belt for any framing project. Its versatility and accuracy make it a revolutionary tool that will streamline your construction process.
The Speed Square, also known as a framing square, is designed to help you measure and mark angles quickly and precisely. It features a 90-degree angle that allows you to easily square up your cuts and ensure accurate framing. Additionally, it has a built-in protractor that enables you to measure and mark angles up to 45 degrees. This feature is especially useful when cutting rafters, stairs, or other angled components of your tiny house.
With the Speed Square, you can say goodbye to the hassle of measuring and marking angles with a protractor or guesswork. It provides a reliable and efficient solution.
Having a Speed Square in your tool belt will significantly improve your framing process. Its compact size and lightweight design make it easy to carry around and have on hand whenever you need it. Whether you’re working on the interior or exterior framing of your tiny house, this tool will be your go-to. It’s essential for achieving precise and accurate cuts.
Incorporating the Speed Square into your construction workflow will not only save you time. It will also result in a more professionally finished project. So, make sure to add this essential framing tool to your toolkit. Experience the convenience and efficiency it brings to your tiny house construction.
String Line
To truly master the art of precise alignment, let the string line become your trusty companion. It effortlessly guides you towards straight and symmetrical perfection. This essential framing tool, commonly used in timber framing, is a simple yet powerful way to ensure accurate measurements and layouts.
The string line consists of a durable and flexible string, typically made of nylon or polyester, which is securely tied between two points. Here are five reasons why the string line is a must-have tool for any serious builder:
Versatility: The string line can be used in a variety of applications. It’s helpful for marking out foundation lines, checking the alignment of walls, or ensuring the straightness of roof trusses. Its flexibility allows it to adapt to different shapes and angles, making it a versatile tool for all your framing needs.
Precision: When properly tensioned, the string line provides a straight and level reference line. This enables you to achieve precise measurements and layouts. This is especially crucial in tiny house construction, where every inch counts. Even the slightest misalignment can lead to significant issues down the line.
Ease of Use: Using the string line is a straightforward process. Simply tie one end of the string to a fixed point, stretch it taut, and secure the other end to another fixed point. The taught string will act as your guide, providing a visual reference for aligning and positioning your framing components.
Cost-Effective: Compared to more complex leveling tools, the string line is an affordable option that delivers reliable results. It requires minimal maintenance and can be reused for multiple projects. This makes it a cost-effective choice for both DIY enthusiasts and professional builders.
Portability: The string line is lightweight and easy to transport, making it an ideal tool for on-site construction work. Whether you’re building a tiny house in a remote location or working on multiple projects simultaneously, the string line can be easily carried in your toolbox, ready to assist you whenever and wherever you need it.
Incorporating the string line into your framing toolkit will significantly improve the accuracy and efficiency of your construction projects. With its versatility, precision, ease of use, cost-effectiveness, and portability, this humble tool proves to be an invaluable asset. It’s essential for any builder striving for perfection in their craft.
Chalk Line
Now that you have a clear understanding of the importance of a string line in framing your tiny house, let’s move on to another essential tool. This tool is the chalk line.
The chalk line is a simple yet effective tool that helps you create straight and accurate lines on your framing materials. To use a chalk line, start by filling the chalk box with chalk powder. Then, hold one end of the line against the starting point of the line you want to create, and stretch it out to the end point. Make sure the line is taut and adjust it if necessary.
Once the line is in position, take the chalk box and snap it against the line. This action will release a fine cloud of chalk powder, which will leave a visible line on your materials. Using a chalk line is crucial in framing your tiny house as it ensures precision and accuracy in your measurements. It allows you to mark lines for cutting, nailing, and aligning your framing materials.
By having straight and accurate lines, you can avoid mistakes and achieve a professional-looking result. Now that you understand the importance of a chalk line, it’s time to consider purchasing a framing kit.
A framing kit typically includes essential tools such as a hammer, chalk line, and other tools necessary for the framing process. Investing in a framing kit can save you time and money, as it provides you with the necessary tools in one package. It also ensures that you have all the tools you need at hand, without the hassle of searching for individual items.
When shopping for a framing kit, make sure to choose one that is of high quality and durable. You’ll be using these tools extensively throughout your tiny house construction project.
Level
The level is an indispensable tool for ensuring straight and even surfaces in your construction project. When it comes to framing tools for your tiny house, a level should be at the top of your list.
Here are four reasons why a level is essential for your construction project:
1. Accurate measurements: A level helps you achieve precise measurements by indicating whether a surface is perfectly horizontal or vertical. This ensures that your walls, floors, and ceilings are level, resulting in a structurally sound and aesthetically pleasing tiny house.
2. Proper alignment: Using a level, you can ensure that all your framing elements are properly aligned. This is crucial for maintaining the integrity of your structure and preventing any potential issues down the line.
3. Easy installation: With a level, you can easily determine the correct placement of studs, beams, and other framing components. This simplifies the installation process and helps you avoid costly mistakes.
4. Professional finish: A level allows you to achieve a professional finish by ensuring that all surfaces are perfectly flat and plumb. This attention to detail will make your tiny house look polished and well-built.
Investing in a high-quality level is a wise decision when it comes to framing tools for your tiny house. It won’t only make your construction process smoother and more efficient. It will also help you achieve a structurally sound and visually appealing final result. So, don’t forget to add a level to your toolbox!
Laser Level
Achieve precise measurements and ensure proper alignment with a laser level. This elevates your construction project to a whole new level of accuracy and professionalism.
A laser level is an essential tool for any timber frame or framing project. It uses laser technology to project a straight and level line onto a surface. This allows you to easily mark the correct positions for walls, beams, and other structural elements. This ensures that everything is aligned correctly and eliminates the need for tedious manual measurements.
With a laser level, you can quickly and efficiently complete your framing project with confidence, knowing that everything is in its rightful place.
The laser level is particularly useful when working on a tiny house, where precision is of utmost importance due to limited space. It allows you to accurately measure and mark the positions of walls, windows, doors, and other components. This ensures that they fit perfectly within the small footprint of the house.
Additionally, a laser level can help you maintain a consistent level throughout the construction process. It prevents potential issues with uneven floors or walls. By investing in a high-quality laser level, you can save time, effort, and materials by avoiding costly mistakes and rework.
So, whether you’re a professional builder or a DIY enthusiast, a laser level is a must-have tool for any framing project. It ensures that your tiny house is constructed with precision and perfection.
Rotary Laser
Make your construction projects easier and more precise with a rotary laser. You’ll be amazed to learn that it can save you up to 50% of your time compared to using traditional leveling methods.
A rotary laser is a valuable tool for carpentry and construction, as it provides an accurate and efficient way to establish level lines. This power tool emits a rotating laser beam that creates a 360-degree horizontal line. This allows you to easily mark reference points and ensure that your framing is perfectly level.
With its self-leveling feature, the rotary laser automatically adjusts itself to ensure accuracy, even on uneven surfaces. This eliminates the need for tedious manual adjustments and guarantees consistent results every time.
Using a rotary laser in your tiny house construction project will greatly improve your efficiency. With its long-range capabilities, you can easily level large areas in a fraction of the time it would take with traditional methods.
Whether you’re working on the foundation, walls, or roof framing, the rotary laser will provide precise measurements. It will also help you maintain the integrity of your structure. It’s also a versatile tool that can be used for a variety of other tasks, such as installing drop ceilings or leveling cabinets.
Investing in a rotary laser will not only save you time. It will also ensure that your carpentry work is top-notch, resulting in a sturdy and well-built tiny house.
Hand Tools For A Tiny Home

When it comes to hand tools for your tiny home, there are a few key points to consider.
First, you’ll need a reliable hammer for driving nails and securing framing elements.
A utility knife is essential for cutting various materials, while a chisel can be used for shaping and trimming wood.
A pry bar or cat’s paw is handy for removing nails and dismantling structures, and a hand saw is necessary for making precise cuts in lumber.
These tools are essential for any DIY tiny home builder and will help you complete your project efficiently and effectively.
Hammer
To get the most out of your framing project, you’ll need a reliable hammer. It effortlessly drives nails into the wood, ensuring a sturdy and durable structure for your tiny house. When it comes to choosing a hammer for framing, there are a few key factors to consider.
1. Weight and Balance: Look for a hammer that feels comfortable in your hand and has a balanced weight distribution. This will allow for better control and accuracy when driving nails into the wood.
2. Claw Design: Opt for a hammer with a curved claw design, as it’ll make it easier to remove nails when necessary. The claw should be sharp and sturdy, able to grip nails securely without slipping.
3. Material: Consider the material of the hammer head. Steel is a popular choice due to its durability and strength. Look for a hammer with a heat-treated head, as it’ll be less prone to chipping or deforming over time.
In addition to a reliable hammer, you may also want to invest in a framing chisel. This tool is essential for trimming and shaping wood during the framing process. A framing chisel with a sharp, durable blade will allow you to make precise cuts and create clean joints. When selecting a framing chisel, look for one with a comfortable handle that provides a good grip. This will enhance control and reduce fatigue during prolonged use.
With a high-quality hammer and framing chisel in your toolkit, you’ll be well-equipped to tackle any framing project for your tiny house.
Utility Knife
If you’re looking to enhance your toolkit for framing, consider adding a utility knife to your collection. A utility knife is a versatile hand tool that can be used for various tasks when working with timber. It’s designed with a retractable blade that can be easily replaced when dull, ensuring a sharp cutting edge at all times.
The utility knife is lightweight and easy to handle, making it a convenient tool to have on hand during your framing projects.
When it comes to framing, a utility knife can be incredibly useful. It can be used to make precise cuts on timber, allowing for accurate measurements and clean edges. This is particularly important when working with framing materials. Any inaccuracies can affect the overall stability and structural integrity of the tiny house.
Additionally, a utility knife can be used to score and mark timber, making it easier to snap or cut along the desired lines. This can be especially handy when installing framing members or making adjustments to existing structures.
Overall, a utility knife is an essential tool for any framing project. It provides you with the precision and control needed to create a solid and well-built tiny house.
Chisel
Don’t overlook the versatility and precision a chisel brings to your toolkit.
When it comes to framing a tiny house roof, a chisel is an essential tool that can make a significant difference in the quality and efficiency of your work. This handheld cutting tool is designed to shape, cut, and remove excess wood, allowing you to create precise joints and smooth surfaces.
When framing a tiny house, a chisel becomes invaluable in various ways.
Firstly, it helps you create clean and accurate cuts in the framing lumber. By using a chisel, you can remove small sections of wood precisely, ensuring a tight fit between the framing members. This is especially important when working with tight spaces or intricate designs, as it allows you to make adjustments with ease.
Additionally, a chisel is essential for creating mortise and tenon joints, which are commonly used in framing. These joints provide structural stability and strength to the frame, ensuring the long-term durability of your tiny house.
A chisel is a must-have tool for any framing project, including building a tiny house. Its versatility and precision make it an essential tool for creating precise cuts and joints in the framing lumber. By investing in a high-quality chisel, you can ensure that your tiny house frame is sturdy, well-crafted, and built to last.
So, don’t underestimate the importance of this simple yet powerful tool in your toolkit.
Pry Bar / Cat’s Paw
When it comes to tackling those stubborn nails and removing old boards, a pry bar or cat’s paw is a real lifesaver for any DIY enthusiast. These tools are specifically designed to assist in the removal of nails, staples, and other fasteners from various surfaces. Whether you’re disassembling an old structure or need to make adjustments during the construction process, a pry bar will be an invaluable addition to your toolkit.
Here are five important points to consider when choosing a pry bar:
Length: The length of the pry bar is crucial for leverage and reach. Opt for a pry bar that’s long enough to provide sufficient leverage, but not too long that it becomes difficult to handle in tight spaces.
Material: Look for pry bars made from high-quality steel, as they offer durability and strength. Steel pry bars are less likely to bend or break under pressure, ensuring they’ll withstand heavy-duty tasks.
Design: Consider the design of the pry bar. Look for features such as a curved end, which provides better leverage and prevents damage to the material you’re working on.
Ergonomics: A comfortable grip is essential when using a pry bar for extended periods. Look for pry bars with ergonomic handles that offer a secure grip and reduce hand fatigue.
Versatility: Some pry bars come with additional features, such as built-in nail pullers or pry points. These versatile options can save you time and effort by eliminating the need for multiple tools.
Using a pry bar correctly requires some knowledge of construction techniques. To remove a nail or staple, position the curved end of the pry bar under the fastener head and apply downward pressure. Once the fastener is lifted slightly, use pliers to grip and pull it out completely. It’s important to use steady and controlled force to avoid damaging the surrounding material. Additionally, be cautious when using a pry bar on delicate surfaces to prevent any unintended marks or dents.
With the right pry bar and proper technique, you’ll be able to effortlessly remove nails and staples, making your framing tasks much more efficient.
Hand Saw
To make your hand sawing tasks easier and more efficient, choose a saw with sharp teeth that can cut through wood quickly and smoothly. Did you know that a high-quality hand saw can cut through wood up to 10 times faster than a dull one?
When it comes to framing, a hand saw is an essential tool that allows you to make precise and accurate cuts in wood. Look for a hand saw specifically designed for framing, as it’ll have a longer blade length and a more aggressive tooth pattern. The longer blade provides better control and allows you to make longer cuts with ease. The aggressive tooth pattern ensures faster and smoother cuts through the wood.
When selecting a hand saw for framing, consider the type of teeth it has. Rip teeth are designed for cutting along the grain of the wood, while crosscut teeth are ideal for cutting across the grain. For framing purposes, a hand saw with a combination of rip and crosscut teeth is recommended. This allows you to tackle various cutting tasks without having to switch between different saws.
Additionally, look for a hand saw with a comfortable and ergonomic handle. This’ll reduce fatigue and provide a better grip, especially during long periods of use. By investing in a high-quality hand saw designed for framing, you can significantly improve your efficiency and accuracy. This is especially true when working on your tiny house project.
Screwdriver
You can easily tighten screws and assemble furniture with a screwdriver that fits comfortably in your hand. It should also have a magnetic tip for easy handling of screws. When it comes to framing a tiny house, having a reliable screwdriver is essential.
A screwdriver with a magnetic tip ensures that screws stay in place, preventing them from falling and getting lost in the process. This is especially important when working with studs and lumber, as securing them together requires precise and tight fastening.
When choosing a screwdriver for framing, opt for one that is sturdy and durable. Look for a screwdriver with a solid handle that provides a comfortable grip. This allows you to apply sufficient force without straining your hand. Additionally, consider the size and shape of the screwdriver’s tip.
For framing purposes, a Phillips head screwdriver is commonly used. It’s designed to fit perfectly into Phillips screws commonly used in framing. Ensuring a proper fit will minimize the risk of stripping or damaging the screws.
Another factor to consider is the length of the screwdriver. In framing, you may need to reach tight spots or work with longer screws, so a longer screwdriver may be necessary. However, keep in mind that a longer screwdriver may be more difficult to control and maneuver in smaller spaces. Therefore, it’s important to strike a balance between length and maneuverability.
By choosing a reliable screwdriver that meets these criteria, you can efficiently work on your tiny house framing project with ease and precision.
Tool Belt
Carrying your tools on a convenient tool belt is like having a utility belt. It allows you to easily access and switch between your essential equipment while working on your tiny house framing project.
A tool belt specifically designed for framers will have multiple pockets and pouches to hold different types of tools. This ensures that you can keep your framing hammer, tape measure, and other essential tools within easy reach at all times. With a tool belt, you won’t have to constantly search for your tools. It also eliminates the need for multiple trips back and forth to your toolbox, saving you valuable time and energy.
To maximize the functionality of your tool belt, consider the following three essential features:
1. Multiple Pockets: Look for a tool belt that has multiple pockets of varying sizes. This will allow you to organize your tools based on their size and importance. Keep frequently used tools, such as a framing square or a utility knife, in the smaller pockets for quick access.
2. Hammer Holder: A sturdy hammer holder is a must-have feature for any framer’s tool belt. Choose a belt with a hammer loop or a dedicated holder to securely store your framing hammer. This will prevent accidental drops and ensure that your hammer is always within reach when you need it.
3. Circular Saw Hook: If you frequently use a circular saw for your framing projects, look for a tool belt that has a dedicated circular saw hook. This will allow you to safely hang your saw when not in use, keeping it out of the way but easily accessible when needed. Make sure the hook is sturdy and can securely hold the weight of your circular saw.
Investing in a high-quality tool belt specifically designed for framers will greatly enhance your efficiency and productivity. This applies when working on your tiny house framing project. By keeping your essential tools within arm’s reach, you can focus on the task at hand and complete your project with ease.
Power Tools

When it comes to power tools for your tiny home, there are several key options to consider.
First, the Circular Saw is a versatile tool that can be used for a variety of cutting tasks, from straight cuts to bevel cuts.
Second, the Miter Saw is ideal for making precise angled cuts, making it essential for trim work and finishing touches.
Third, the Reciprocating Saw is perfect for demolition and cutting through tough materials like nails and pipes.
Fourth, the Table Saw is a must-have for woodworking projects, allowing you to make accurate rip cuts and cross cuts.
Lastly, the Drill is a versatile tool that can be used for drilling holes and driving screws, making it essential for any construction project.
Circular Saw
Get your hands on a reliable circular saw to effortlessly cut through materials and make precise cuts for your tiny house construction. A circular saw is one of the most essential framing tools you’ll need for your project.
This versatile tool is designed to cut through various materials such as wood, plywood, and even metal with ease. With its circular blade, it can quickly make straight cuts, bevel cuts, and even plunge cuts. This makes it perfect for framing walls, cutting roof rafters, and trimming lumber to the exact dimensions needed for your tiny house.
When choosing a circular saw for your tiny house construction, look for one that has a powerful motor and a sharp, durable blade. A saw with a high RPM (revolutions per minute) will ensure that you can cut through materials quickly and efficiently. Additionally, look for a saw with a comfortable grip. Also, find one with an adjustable cutting depth. This will allow you to make precise cuts at different depths.
It’s also important to consider the size and weight of the saw, as you’ll want a tool that’s easy to maneuver and handle for extended periods of time.
A circular saw is an essential tool for any tiny house construction project. It’ll allow you to make precise cuts and easily navigate through various materials. This makes it a versatile and indispensable tool for framing walls, cutting roof rafters, and trimming lumber.
Make sure to choose a reliable saw with a powerful motor, sharp blade, and comfortable grip. This will ensure a smooth and efficient construction process.
Miter Saw
Make sure you’ve got a miter saw for precise and accurate angled cuts in your construction project.
A miter saw is an essential tool for framing, as it allows you to make precise cuts at different angles. With a miter saw, you can easily cut through different types of materials, including wood, plastic, and metal.
It’s designed with a circular blade that’s mounted on a pivoting arm, which allows you to make angled cuts with ease. Whether you need to make a 45-degree cut for a corner joint or a more complex angled cut for a roof truss, a miter saw can handle it all.
When choosing a miter saw for your framing needs, there are a few factors to consider. First, look for a saw with a powerful motor that can handle the demands of cutting through thick and hard materials. A saw with a high RPM (rotations per minute) will also ensure smooth and quick cuts.
Additionally, consider the size of the blade and the cutting capacity of the miter saw. A larger blade will allow you to make longer and deeper cuts, which is important for framing projects. Finally, look for a miter saw with a stable and sturdy base, as this will ensure accurate and precise cuts.
Overall, investing in a high-quality miter saw is a must for any framing project, as it’ll greatly improve the efficiency and accuracy of your cuts.
Reciprocating Saw
To ensure precise and efficient cuts, consider adding a reciprocating saw to your collection of tools. This is especially important for your construction project. A reciprocating saw, also known as a saber saw or a sawzall, is a versatile cutting tool that can handle a wide range of materials.
Whether you’re a DIY enthusiast or a professional timber framer, a reciprocating saw is a must-have tool. It’s essential for cutting through timber, steel studs, and other materials with ease.
Here are three reasons why a reciprocating saw is an essential tool for framing your tiny house:
1. Versatility: A reciprocating saw can cut through a variety of materials, making it perfect for any framing job. From cutting through timber beams to slicing through steel studs, this tool can handle it all. Its powerful motor and sharp blades allow for quick and precise cuts, saving you time and effort.
2. Accessibility: Unlike other saws, a reciprocating saw is compact and lightweight, making it easy to maneuver in tight spaces. Whether you’re working in a small room or crawling under the house, this tool will allow you to make accurate cuts without any hassle.
3. Efficiency: With its rapid back-and-forth motion, a reciprocating saw can quickly cut through even the toughest materials. This speed and efficiency are especially beneficial when working on a time-sensitive project like building a tiny house. You can rely on this tool to get the job done quickly and accurately, without compromising on quality.
By adding a reciprocating saw to your arsenal of framing tools, you’ll be equipped to tackle any cutting task with precision and ease. Whether you’re a professional timber framer or a DIY enthusiast, this versatile tool will prove to be invaluable in your construction projects.
So, don’t hesitate to invest in a high-quality reciprocating saw and experience the benefits it brings to your tiny house build.
Table Saw
Now that you’ve learned about the versatility and power of the reciprocating saw, let’s move on to another essential framing tool for your tiny house project: the table saw.
The table saw is a crucial tool that’ll greatly assist you in making precise and accurate cuts on your framing materials. A table saw consists of a circular saw blade mounted on an arbor, which is driven by an electric motor. The blade protrudes through the surface of the table, allowing you to guide your materials along the blade for cutting.
With its adjustable fence and miter gauge, the table saw enables you to achieve straight and angled cuts with ease. This tool is particularly useful when working with larger pieces of lumber, as it provides stability and control throughout the cutting process.
When it comes to framing tools, a table saw is an absolute must-have. Its ability to make clean and precise cuts will ensure that your framing materials fit together seamlessly. This results in a sturdy and well-built tiny house.
Whether you need to rip long pieces of plywood or make angled cuts for framing joints, the table saw will be your go-to tool. It helps you achieve accuracy and efficiency in your construction project. Don’t underestimate the power of this essential tool when it comes to framing your tiny house.
Drill
Get ready to power through your construction project with the versatile and indispensable tool. It should be a staple in every DIYer’s toolbox: the drill.
Whether you’re a seasoned woodworking professional or a novice builder, the drill is a must-have for any project involving wood. With its ability to create precise holes and drive screws effortlessly, the drill is an essential tool that will save you time and effort.
Here are three reasons why the drill is an invaluable tool for any builder:
Versatility: The drill can perform a wide range of tasks, making it an essential tool for any woodworking project. From drilling holes of various sizes to driving screws into different types of wood, the drill is a versatile tool that can handle any task with ease.
Efficiency: With its powerful motor and adjustable speed settings, the drill allows you to work quickly and efficiently. You can easily adjust the drill’s speed to match the requirements of your project, ensuring precise and accurate results every time.
Precision: The drill’s ability to create precise holes is unmatched by any other tool. With its sharp drill bits and adjustable depth settings, you can create holes of any size and depth with ease. This level of precision is crucial for a variety of woodworking tasks, such as attaching framing members or installing hardware.
The drill is an essential tool for any DIYer or professional builder. Its versatility, efficiency, and precision make it an indispensable tool for any woodworking project. Whether you’re building a tiny house or tackling any other construction project, make sure to have a reliable and high-quality drill in your toolbox.
Impact Driver
The impact driver is an absolute game-changer for any construction project. It allows you to effortlessly drive screws and fasten materials with incredible speed and power. When it comes to framing a tiny house, the impact driver becomes an indispensable tool.
It is especially useful when working with joists. It can quickly and easily drive screws into the wood, providing a secure and sturdy connection. The power and torque of the impact driver ensure that the screws are driven in with precision and strength, making it an ideal tool for framing tasks.
In addition to working with wood, the impact driver is also capable of driving screws into steel, which is commonly used in tiny house construction. This versatility allows you to tackle various framing challenges without the need for multiple tools. Whether you are fastening steel studs or connecting steel plates, the impact driver can handle the task efficiently and effectively.
Furthermore, the impact driver is an excellent tool for using with a nailer when framing a tiny house. It can easily drive nails into the wood, providing additional reinforcement and stability to the structure. This combination of an impact driver and nailer ensures that your framing is secure and durable.
The impact driver is an essential tool for any framing project, especially when building a tiny house. Its speed, power, and versatility make it a must-have for driving screws into wood and steel, as well as for working with a nailer. With the impact driver in your toolkit, you can confidently tackle framing tasks and create a sturdy and reliable structure for your tiny house.
Magnetic Bit Storage
Storing your bits has never been easier with magnetic bit storage. It provides convenience and efficiency while keeping your workspace organized.
Magnetic bit storage is a must-have tool for any framing project. It allows you to easily and securely store your bits in one place. No more searching through a messy toolbox or losing bits in the bottom of your tool bag. With magnetic bit storage, you can simply attach your bits to the magnetic strip or holder, ensuring they are always within reach and ready to use. This not only saves you time but also prevents damage to your bits, as they are protected from being tossed around or getting lost.
Having a magnetic bit storage system also promotes a more efficient work process. You can quickly locate the specific bit you need without wasting time rummaging through multiple compartments or containers. The magnetic strip or holder keeps your bits neatly organized and easily visible, allowing you to select the right bit for the job at hand. This eliminates the frustration of using the wrong bit or having to stop and switch bits mid-task. With magnetic bit storage, you can focus on your framing project and maintain a smooth workflow.
Investing in magnetic bit storage is a wise choice for anyone who regularly uses framing tools. It not only helps keep your workspace organized but also saves you time and prevents damage to your valuable bits. With this tool, you can efficiently store and access your bits, ensuring a smooth and productive framing experience. So, make sure to add magnetic bit storage to your list of essential framing tools for your tiny house project.
Bit Holder
Utilizing a bit holder enhances the efficiency of your work process by keeping your bits neatly organized and easily accessible. A bit holder is a small, compact tool. It securely holds your bits in place, preventing them from getting lost or scattered around your workspace.
With a bit holder, you can conveniently store and carry multiple bits, ensuring that you have the right tool for the job at all times.
One of the key features of a bit holder is its clamp mechanism. This mechanism securely holds the bits in place, preventing them from falling out or getting misplaced. The clamp is typically made of a durable material, such as steel, ensuring that it can withstand the rigors of daily use. Additionally, the clamp allows for quick and easy bit changes, saving you valuable time and effort.
When working on a tiny house project, having a bit holder is especially beneficial. The compact size of a tiny house means that you’ll often be working in tight spaces, such as when installing roof framing. With a bit holder, you can easily access and retrieve the specific bit you need, even in cramped conditions. This not only saves you time but also reduces the frustration of searching for the right tool.
So, whether you’re installing roof trusses or framing walls, a bit holder is an essential tool that’ll greatly enhance your efficiency and productivity.
Oscillating Multi Tool
Now that we’ve covered the importance of a bit holder in your framing toolkit, let’s move on to another essential tool for building your tiny house. This tool is the oscillating multi-tool. This versatile and powerful tool is a must-have for any serious DIYer or professional builder.
With its ability to handle a wide range of tasks, the oscillating multi tool is a valuable addition to your arsenal of framing tools. The oscillating multi tool is designed to provide precise and controlled cutting, sanding, scraping, and grinding. It’s ideal for a variety of tasks in the construction of your tiny house.
Whether you need to make precise cuts in wood or trim, remove old paint or caulk, or sand down rough surfaces, this tool can handle it all. Its oscillating motion allows for efficient and accurate work, and its compact size makes it easy to maneuver in tight spaces. With the right attachments, you can even use it for plunge cutting, flush cutting, and removing grout.
When it comes to building a tiny house, efficiency and precision are key. The oscillating multi tool is a valuable asset in achieving both. Its ability to handle a wide range of tasks and its compact size are notable features. Additionally, its precise cutting capabilities make it an essential tool for any framing project.
Whether you’re a professional builder or a DIYer, investing in an oscillating multi tool will save you time, effort, and frustration in the long run. So, make sure to add this versatile tool to your collection of framing tools for your tiny house project.
Planer
To achieve smooth and even surfaces in your project, you’ll want to grab a planer. A planer is a versatile woodworking tool that is specifically designed to shave off thin layers of wood to create a flat and uniform surface.
It is commonly used for smoothing rough lumber, removing imperfections, and reducing the thickness of wooden boards. The main feature of a planer is its ability to adjust the depth of cut. This allows you to control how much material is being removed with each pass. By adjusting the depth, you can achieve the desired thickness and smoothness for your wood.
Additionally, a planer has a cutting head with multiple blades that rotate at high speeds. These blades make quick work of removing any irregularities on the surface, leaving you with a clean and professional finish.
When using a planer, it’s important to pay attention to the direction of the wood grain. Planing against the grain can cause tear-out and result in a rough surface. To prevent this, always plane in the same direction as the wood grain.
Additionally, make sure to secure the wood properly to avoid any movement or slipping during the planing process. With the right technique and a good planer, you can easily achieve smooth and even surfaces in your woodworking projects.
Jigsaw
A jigsaw is a versatile power tool that can be used for cutting intricate shapes and curves in various materials.
The jigsaw is an essential tool for framing in a tiny house construction project. It’s designed with a reciprocating blade that moves up and down rapidly, allowing for precise and accurate cuts.
The jigsaw is commonly used for cutting plywood, OSB, and other framing materials. It’s especially useful when cutting openings for windows and doors, as well as for making intricate cuts in trim and molding.
The jigsaw’s ability to cut curves and angles makes it a valuable tool for creating custom shapes and designs in the framing process.
When using a jigsaw for framing, it’s important to choose the right type of blade for the material being cut. There are different blades available for cutting wood, metal, and plastic, each designed for specific purposes.
The jigsaw should be held firmly with both hands to maintain control and stability during the cutting process. It’s recommended to start the cut slowly and steadily, allowing the blade to do the work without forcing it.
The jigsaw should be guided along the marked line, ensuring accuracy and precision. By using a jigsaw, framing in a tiny house can be done efficiently and effectively, resulting in a well-constructed and sturdy structure.
Angle Grinder
The powerful whirring of the angle grinder can be heard as it effortlessly slices through tough materials, like metal and masonry. This creates precise cuts and smooth edges.
This versatile tool is a must-have for any DIY enthusiast or professional builder. This is especially true when it comes to framing projects for your tiny house. Whether you need to cut through metal studs for your picture frames or trim down masonry walls to fit your desired layout, an angle grinder will make quick work of these tasks.
When it comes to framing your tiny house, precision is key. The angle grinder ensures that your cuts are accurate and clean, allowing for a seamless fit between your wall frames. Its high-speed rotating disc can easily shave off excess material. This makes it ideal for fine-tuning measurements and creating tight joints.
Additionally, the angle grinder’s adjustable guard provides added safety. It protects you from sparks and debris, ensuring a secure and efficient work environment.
An angle grinder is an essential tool for framing your tiny house. Its ability to effortlessly cut through tough materials, like metal and masonry, makes it invaluable. This is especially true for creating precise cuts and smooth edges. Whether you’re working on picture frames or trimming down walls, this versatile tool will ensure that your framing projects are done with utmost precision and efficiency.
Nailers

When it comes to nailers for your tiny house construction, there are several key types to consider. The Framing Nailer is ideal for heavy-duty framing tasks. The Siding Nailer is designed specifically for installing siding materials. The Roofing Nailer is essential for attaching shingles and other roofing materials. The Finish Nailer is perfect for trim work and cabinetry. Lastly, the Brad Nailer is a versatile tool that can handle delicate tasks like attaching moldings and small trims.
Framing Nailer
Get ready to take your tiny house framing to the next level. A framing nailer is the game-changing tool you need to speed up your construction process and ensure precision in every nail.
A framing nailer is an essential tool for building a tiny house as it allows you to quickly and efficiently drive nails into the framing members. Here are three key reasons why a framing nailer should be at the top of your list of essential tools for a tiny house:
1. Increased Efficiency: With a framing nailer, you can say goodbye to the tedious process of manually hammering each nail. This tool allows you to rapidly drive nails into the wood with just a pull of the trigger. It significantly speeds up the construction process. You can complete your framing tasks in a fraction of the time it would take using traditional methods.
2. Enhanced Precision: Achieving precise and consistent nail placements is crucial when building a tiny house. A framing nailer helps you achieve this by providing consistent nail depth and positioning. This ensures that each nail is securely fastened and eliminates the risk of nails popping out or causing structural issues. With the precision offered by a framing nailer, you can have confidence in the structural integrity of your tiny house.
3. Reduced Fatigue: Building a tiny house can be physically demanding, especially when it comes to framing. Using a hammer for extended periods can lead to fatigue and strain on your arm and wrist. A framing nailer saves you from the repetitive motion of swinging a hammer. This reduces the strain on your body and allows you to work for longer periods without feeling exhausted.
Incorporating a framing nailer into your collection of essential tools for a tiny house will greatly enhance your construction process. From increased efficiency and precision to reduced fatigue, this tool is a must-have. It’s essential for any builder looking to streamline their framing tasks and ensure the highest quality construction.
Siding Nailer
Incorporating a siding nailer into your tool collection can greatly expedite the installation process. It ensures seamless and secure attachment of the siding panels on your tiny house. A siding nailer is specifically designed to drive nails into the edges of the siding panels, providing a strong and secure hold. This tool is essential for framing the walls of your tiny house. It can save you a significant amount of time and effort compared to using a traditional hammer and nails.
When using a siding nailer, it’s important to ensure that the trusses are properly aligned. Also, make sure they are securely attached before starting the installation process. This will ensure that the siding panels are installed correctly and won’t cause any structural issues down the line. Additionally, make sure to position the siding nailer at the edge of the panel. Apply steady pressure while driving the nails to ensure a secure attachment.
To further enhance the efficiency and accuracy of your siding installation, it’s recommended to use a mallet. Gently tap the siding panels into place after they’ve been secured by the siding nailer. This’ll help to ensure that the panels are flush with each other and create a seamless appearance.
By incorporating a siding nailer into your tool collection and following these guidelines, you can expedite the siding installation process. This will help you achieve professional-looking results for your tiny house.
Roofing Nailer
The roofing nailer is a game-changer for anyone looking to quickly install the roof of their tiny house. It ensures a secure and long-lasting finish with minimal effort.
When it comes to building a tiny house, having the right tools is crucial. A roofing nailer is definitely one of the essential tools needed to build a tiny house. This specialized tool is designed to drive nails into the roof with precision. It makes the installation process much faster and easier.
With a roofing nailer, you can say goodbye to the hassle of manually hammering each nail into place. This powerful tool uses compressed air to drive nails into the roof at a rapid pace, saving you time and effort. It also ensures that each nail is securely fastened, providing a sturdy and reliable roof for your tiny house.
Additionally, a roofing nailer allows for consistent nail placement, resulting in a neat and professional-looking finish.
Investing in a roofing nailer is a wise decision for anyone building a tiny house. It not only saves you time and effort but also ensures a secure and long-lasting roof. So, make sure to include this tool in your list of essential tiny house building tools.
Finish Nailer
Using a finish nailer is like adding the perfect final touch to a masterpiece. It effortlessly secures trim and molding for an elegant and polished look to your tiny house. This tool is a must-have in your tiny house tool list as it’s one of the essential tools necessary to build a tiny house. A finish nailer is specifically designed for attaching delicate materials such as trim, baseboards, crown molding, and casing. It uses smaller gauge nails, typically ranging from 15 to 18 gauge. These nails leave behind small, almost invisible holes that require minimal touch-up work.
With a finish nailer, you can achieve clean and professional-looking finishes, enhancing the overall aesthetic appeal of your tiny house.
When considering what tools do you need to build a tiny house, a finish nailer should definitely be on your shopping list. This tool offers tremendous benefits in terms of efficiency and convenience. It’s designed to provide consistent and precise nail placement. It ensures that each nail is driven to the correct depth without damaging the surrounding material. Some models even offer adjustable depth settings, allowing you to customize the nail depth based on the thickness of the material being attached. This flexibility is particularly useful when working with different types of trim and molding. It ensures a secure and seamless installation every time.
Whether you’re a professional builder or a DIY enthusiast, a finish nailer is an invaluable tool. It’ll make your tiny house construction project a breeze.
Brad Nailer
If you’re looking to effortlessly secure smaller materials like trim and molding, a brad nailer is the perfect tool. It provides a polished finish for the job. This tiny house design tool is specifically designed to drive brads. Brads are small, thin nails that leave behind tiny holes that are easily concealed.
The brad nailer is a must-have among the essential framing tools for a tiny house. It allows for precise and clean installation of delicate trim pieces without the risk of splitting or damaging the material.
When choosing a brad nailer for your tiny house project, there are a few factors to consider. First, you’ll want to look for a model that is lightweight and compact, as this will make it easier to maneuver in tight spaces. Additionally, consider the nail size range that the brad nailer can accommodate. Most models can handle brads ranging from 5/8 inch to 2 inches in length. However, it’s important to ensure that the nailer can accommodate the specific sizes you’ll be using for your tiny house construction. Lastly, opt for a brad nailer with adjustable depth settings. This will allow you to control the depth at which the brad is driven, ensuring a flush and professional-looking finish.
A brad nailer is an essential tool in the arsenal of tiny house tools you will need to build a tiny house. Its ability to effortlessly secure smaller materials like trim and molding makes it a valuable asset in achieving a polished finish. When choosing a brad nailer, prioritize lightweight and compact models. Look for ones with a wide nail size range and adjustable depth settings for optimal performance.
With a brad nailer in hand, you’ll be well-equipped to tackle the intricate trim work that is essential in tiny house construction.
Honorable Mentions

If you’re looking to expand your collection of framing tools for your tiny house project, there are a few honorable mentions worth considering.
First, the Tile Saw is a crucial tool for precise and clean cuts when working with tiles.
The Sds Drill is another must-have tool for its powerful drilling capabilities and versatility.
Additionally, the Flooring Nailer is essential for efficiently installing flooring materials. The Collated Screw Gun is perfect for quickly driving screws into various materials.
Lastly, the Router is a versatile tool that can be used for shaping, cutting, and creating intricate designs on wood.
Tile Saw
When choosing a tile saw for your tiny house, it’s important to consider its cutting capacity. You want a saw that can effortlessly slice through thick porcelain tiles, creating precise and clean cuts. This will ensure that your tiles fit together seamlessly and provide a professional finish to your tiny house design.
Here are some key factors to consider when selecting a tile saw:
Cutting Capacity: Look for a tile saw that has a high horsepower motor and a large cutting capacity. This will allow you to easily cut through even the thickest tiles, saving you time and effort.
Water Source: Most tile saws require a water source to keep the blade cool and prevent dust. Look for a saw that has a built-in water pump or a water reservoir that you can easily fill.
Blade Type: Consider the type of blade that comes with the tile saw. A diamond blade is ideal for cutting through porcelain tiles, as it is durable and provides clean cuts.
Portability: If you plan on using the tile saw for multiple projects or moving it around your tiny house, consider a portable option. Look for a saw that is lightweight and has built-in handles for easy transportation.
Price: Tile saws can range in price, so consider your budget and the features that are most important to you. Keep in mind that investing in a high-quality tile saw will save you time and frustration in the long run.
By carefully considering these factors, you can choose the best tile saw for your tiny house project. Whether you’re a DIY enthusiast or a professional contractor, a reliable and efficient tile saw is an essential tool. It should be in your arsenal of tiny house design tools.
SDS Drill
Now that you’ve learned about the tile saw, let’s move on to another essential tool for designing and building tiny houses: the SDS drill. The SDS drill is a versatile and powerful tool that’s commonly used in construction projects, including framing for tiny houses.
The SDS drill is specifically designed to provide efficient drilling and hammering action. This makes it ideal for tasks such as drilling holes in concrete, masonry, and other hard materials. It features a unique SDS chuck system that allows for quick and easy bit changes, saving you time and effort. Additionally, the SDS drill is equipped with a powerful motor. It also has variable speed settings, giving you precise control over the drilling process.
This tool is a must-have for any tiny house builder. It ensures accurate and secure attachment of framing elements and other structural components.
When planning the layout and design of your tiny house, the SDS drill will be an invaluable tool. It’ll allow you to easily install electrical outlets, plumbing fixtures, and other essential elements with precision and efficiency. Additionally, the SDS drill can be used for assembling furniture, hanging shelves, and completing various finishing tasks.
The SDS drill is an essential tool for designing and building tiny houses. Its versatility, power, and ease of use make it a valuable addition to your toolkit. Whether you’re framing walls, installing fixtures, or completing finishing touches, the SDS drill is essential. It will ensure accuracy and efficiency in your tiny house build. Make sure to include this tool in your list of essential framing tools for your tiny house project.
Flooring Nailer
The flooring nailer is an absolute game-changer for achieving professional-looking floors in your tiny house build. It’s a must-have tool for installing flooring, and should be at the top of your list when buying framing tools.
A flooring nailer is designed specifically for driving nails into hardwood or engineered wood flooring. It ensures a secure and seamless installation. This tool saves you time and effort by allowing you to quickly and efficiently attach flooring boards, without the need for manual nailing. Plus, it provides a consistent and professional finish.
The flooring nailer works by using pneumatic pressure to drive nails at the perfect angle and depth. This results in a tight and secure fit. You can easily customize the nail depth to match the thickness of your flooring material, thanks to its adjustable settings. Whether you’re working with hardwood, laminate, or engineered wood, the flooring nailer will provide precise and reliable results every time.
Investing in a quality flooring nailer is a no-brainer if you want flawless floors in your tiny house.
Collated Screw Gun
If you’re looking to achieve a flawless finish, investing in a quality collated screw gun is a no-brainer.
This essential framing tool is a must-have for anyone working on a converted tool shed, tiny house, or cabin design project.
With a collated screw gun, you can quickly and efficiently drive screws into wood, saving you time and effort.
Here are five reasons why a collated screw gun is the right tool for the job:
Speed: A collated screw gun allows you to drive screws rapidly, making the entire construction process much faster. This is especially crucial when working on a time-sensitive project like a tiny house.
Precision: The collated screws are perfectly aligned, ensuring a clean and professional finish. You won’t have to worry about crooked or misplaced screws, as the tool consistently drives them in the right spot.
Convenience: With a collated screw gun, you can hold multiple screws at once, eliminating the need to constantly reload. This convenience saves you time and makes the whole process more efficient.
Versatility: This tool is compatible with different types of screws, allowing you to choose the right one for your specific needs. Whether you’re using screws for framing, decking, or sheathing, a collated screw gun can handle it all. It’s designed with comfort in mind for ease of use. It features a lightweight and ergonomic design, reducing strain on your hand and arm during extended use.
A collated screw gun is an essential tool for anyone working on a converted tool shed, tiny house, or cabin design project. Its speed, precision, convenience, versatility, and ergonomic design make it the right tool to achieve a flawless finish.
Don’t compromise on the quality of your work – invest in a collated screw gun and make your construction process more efficient and enjoyable.
Router
Looking to add some creative flair to your woodworking projects? A router is the perfect tool for you. Whether you’re building a tool shed for your tiny house or using it as a teaching tool for school, a router can help. It can help you achieve precise and intricate designs.
This versatile tool is designed to hollow out an area in the face of a wooden workpiece. It allows you to create decorative edges, cut grooves, and even carve out intricate patterns. With the right router bit, you can easily transform a plain piece of wood into a work of art.
When it comes to building a tiny house, having the right tools is crucial. A router is one of those tools that you simply can’t do without. It allows you to create precise and clean cuts, making your construction process much easier and more efficient. With a router, you can easily shape and trim wood pieces to fit perfectly, ensuring a professional and polished finish.
From cutting dadoes for shelves to creating decorative moldings for trim work, a router is an indispensable tool. It’s essential for any tiny house builder. So, if you’re wondering what tools you need to build a tiny house, make sure to include a router in your arsenal.
Pneumatic
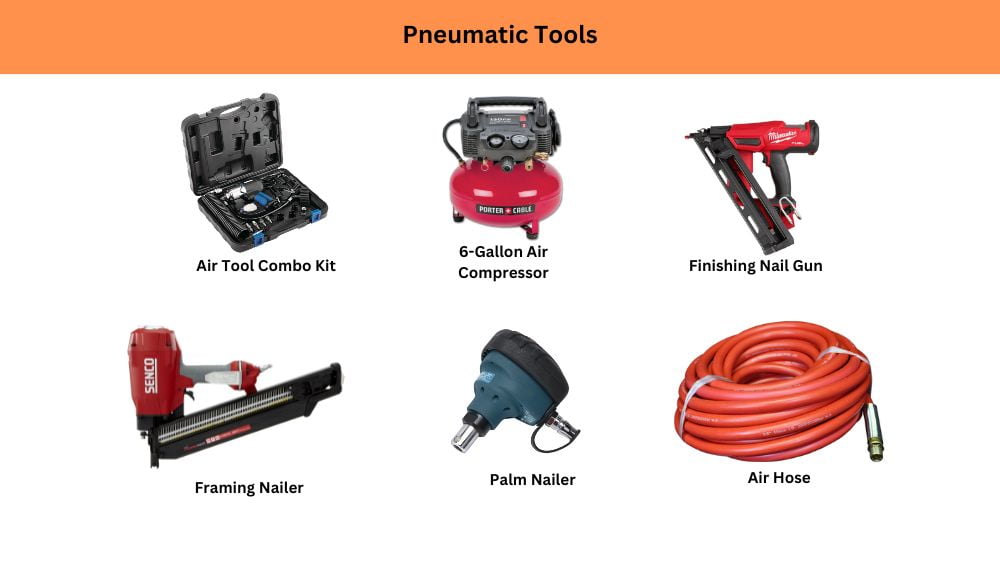
If you’re looking for a comprehensive set of pneumatic tools for your tiny house project, consider investing in an Air Tool Combo Kit.
This kit typically includes a 6-gallon air compressor, which provides enough power to run multiple tools simultaneously.
Some key tools to look for in this kit are the Finishing Nail Gun, which is perfect for trim work and cabinetry, the Framing Nailer, which is essential for constructing the walls and roof, and the Palm Nailer, which is great for tight spaces and hard-to-reach areas.
These tools will greatly simplify your framing tasks and ensure a professional finish.
Air Tool Combo Kit
One tool that is a must-have for any tiny house builder is the air tool combo kit, which will save you time and money in the long run. This kit includes a range of essential tools powered by compressed air. It’s a versatile and efficient option for all your framing needs.
The combo kit typically includes a framing nailer, a finish nailer, a brad nailer, a stapler, and an air compressor.
The framing nailer is the backbone of the kit, allowing you to quickly and securely fasten framing members together. It can handle large nails and can drive them into the wood with ease.
The finish nailer is perfect for smaller, more delicate tasks such as installing trim and molding. It provides a clean and professional finish to your tiny house.
The brad nailer is ideal for attaching thin pieces of wood and is commonly used for projects like paneling and cabinetry.
The stapler is a versatile tool that can be used for a variety of applications, including attaching insulation and sheathing.
Lastly, the air compressor powers all these tools, providing a constant and reliable source of compressed air.
With the air tool combo kit, you’ll have all the essential tools you need. You can efficiently frame your tiny house and ensure a sturdy and well-built structure.
6-Gallon Air Compressor
Now that we’ve discussed the importance of an Air Tool Combo Kit for your framing needs, let’s move on to another essential tool: the Gallon Air Compressor.
This powerful machine plays a crucial role in providing the necessary air pressure to operate pneumatic tools efficiently. The Gallon Air Compressor is a compact and portable device that can deliver a continuous stream of pressurized air. It’s equipped with a motor that compresses air and stores it in a tank, allowing for consistent airflow.
The size of the tank usually ranges from 1 to 6 gallons, and the larger the tank, the longer you can use your pneumatic tools without interruption. With a Gallon Air Compressor, you can easily power your nail guns, staple guns, and other pneumatic tools required for framing your tiny house.
It provides a steady supply of compressed air, ensuring that your tools operate at their optimal performance. The compressor’s pressure can be adjusted to meet the specific requirements of each tool. This gives you complete control over the power and precision of your work. Additionally, many models come with built-in regulators and gauges for easy monitoring and adjustment of air pressure.
A Gallon Air Compressor is an indispensable tool for any framing project, especially when building a tiny house. Its compact size and portable design make it easy to transport and store. Its reliable performance ensures that your pneumatic tools work efficiently..
So, if you want to take your framing skills to the next level and achieve professional results, investing in a Gallon Air Compressor is a smart choice.
Finishing Nail Gun
When you’re working on your framing project, picture yourself effortlessly maneuvering the Finishing Nail Gun. It effortlessly drives nails into the wood with precision and speed. This powerful tool is specifically designed to quickly and securely attach finishing nails to your tiny house’s frame.
With its lightweight design and ergonomic handle, the Finishing Nail Gun allows for comfortable extended use. It minimizes fatigue during long hours of work. Its compact size also enables easy access to tight spaces, ensuring that every nail is driven exactly where you need it.
To further enhance your experience with the Finishing Nail Gun, consider the following features:
Adjustable Depth Control: This feature allows you to easily adjust the depth at which the nail is driven into the wood. It ensures a consistent and professional finish throughout your framing project.
Quick Jam Release: In the event of a nail jam, this tool features a quick jam release mechanism that allows for efficient troubleshooting and minimal downtime. Simply follow the instructions provided by the manufacturer to clear any obstructions and get back to work in no time.
Magazine Capacity: The Finishing Nail Gun typically comes with a magazine capacity of up to 100 nails, reducing the need for frequent reloads. This enhances your productivity by allowing you to work for longer periods without interruption.
With the Finishing Nail Gun in your arsenal, you can confidently tackle your framing project. You have a reliable and efficient tool at your disposal. Its precision and speed will help you achieve professional results, making it an essential tool for your tiny house construction.
Framing Nailer
Equipped with a framing nailer, you’ll feel like a superhero effortlessly driving nails into the wood with lightning speed and precision. This powerful tool is an absolute must-have for any tiny house project.
A framing nailer is designed specifically for framing, allowing you to quickly and securely attach large pieces of lumber together. It uses compressed air or gas to drive nails into the wood, eliminating the need for manual hammering. This not only speeds up the construction process but also ensures consistent and sturdy connections.
When choosing a framing nailer for your tiny house, there are a few key factors to consider. First, determine the nail size and angle required for your project. Most framing nailers are compatible with 2 to 3 ½ inch nails and have a 21-degree or 30-degree angle.
Next, consider the nail capacity and magazine type. A larger nail capacity means fewer reloads, saving you time and effort. Additionally, a coil-style magazine can hold more nails than a strip-style magazine.
Another important feature to look for is the depth adjustment mechanism. This allows you to control how deep the nail is driven into the wood, ensuring a flush finish. Some framing nailers also come with an adjustable exhaust, which directs the air away from your face and workspace.
Additionally, consider the weight and ergonomics of the nailer. A lightweight and well-balanced tool will reduce fatigue during long hours of work. Finally, don’t forget to check for safety features such as a trigger lock and anti-dry fire mechanisms.
Overall, investing in a high-quality framing nailer will significantly speed up your tiny house construction. It will make the framing process a breeze. With its exceptional power and precision, this tool will undoubtedly become your go-to for all framing tasks. So gear up with a framing nailer, and get ready to transform your tiny house dreams into a reality.
Palm Nailer
Get ready to experience the power and convenience of a palm nailer. It’s the ultimate tool for effortlessly driving nails into tight spaces with ease. Whether you’re working on a tiny house or any other framing project, a palm nailer is a must-have tool in your arsenal.
Here are four reasons why you should consider adding a palm nailer to your toolkit:
1. Compact and Portable: Palm nailers are small and lightweight, making them easy to carry around and maneuver in tight spaces. Their compact size allows you to reach areas that are difficult to access with a traditional framing nailer, such as corners and edges. You can easily fit a palm nailer in your pocket or tool belt, ensuring that it’s always within reach.
2. Versatile: Palm nailers are compatible with a wide range of nail sizes, from standard nails to bulkier nails used in framing. This versatility makes them suitable for various applications, including framing, decking, and siding. With a palm nailer, you won’t need to switch between different nailers for different tasks, saving you time and effort.
3. Increased Precision: The design of a palm nailer allows for precise nail placement, ensuring that each nail is driven in exactly where you want it. This level of control is particularly useful when working in tight spaces or when dealing with delicate materials. You can easily adjust the depth and angle of the nail, resulting in a professional and clean finish.
4. Reduced Fatigue: Using a palm nailer significantly reduces hand and arm fatigue compared to using a traditional hammer. The ergonomic design and vibration-dampening features ensure a comfortable grip and minimize strain on your muscles. This means you can work for longer periods without experiencing discomfort, improving overall productivity.
A palm nailer is a versatile and powerful tool that offers convenience and precision in tight spaces. Its compact size, portability, and compatibility with various nail sizes make it an essential tool for any framing project. With a palm nailer in your toolkit, you’ll be able to drive nails effortlessly and achieve professional results with ease.
Air Hose
Make sure you grab hold of the air hose, the lifeline that connects your palm nailer to the power and precision it needs to drive nails effortlessly.
The air hose is an essential tool for any framing project, especially when working on a tiny house. It is responsible for delivering a steady stream of compressed air from the air compressor. This allows the palm nailer to function properly.
When choosing an air hose for your palm nailer, there are a few factors to consider. First, you need to determine the length of the hose you will require. Measure the distance between your air compressor and the farthest point you will be working. It is important to choose a hose that is long enough to reach this distance, but not too long as it can reduce the efficiency of the airflow.
Additionally, consider the diameter of the hose. A larger diameter will allow for a greater volume of airflow, resulting in more power for your palm nailer.
Once you have selected the appropriate length and diameter, it is crucial to ensure the air hose is made of high-quality materials. Look for hoses that are reinforced with braided or spiral fibers, as they are more resistant to wear and tear. Also, check for a hose that has a high burst pressure rating, indicating its ability to handle high-pressure air safely.
Finally, make sure the hose has sturdy fittings that securely attach to both the air compressor and the palm nailer.
The air hose is a crucial component when using a palm nailer for framing a tiny house. By selecting the right length, diameter, and material, you can ensure optimal performance and longevity of your air hose. So, make sure to invest in a high-quality air hose that will provide the power and precision you need to drive nails effortlessly and efficiently.
Other Tools

When it comes to other tools that are essential for your tiny house project, there are a few key points to consider.
Firstly, clamps are vital for holding pieces together securely during assembly.
Secondly, ear and eye protection should be worn at all times to safeguard against potential hazards and ensure a safe working environment.
Lastly, work gloves are crucial for protecting your hands from cuts, abrasions, and splinters. A mask will protect you from inhaling harmful dust and particles.
Additionally, a tool belt is a convenient accessory. It allows you to keep your most frequently used tools within easy reach, enhancing your efficiency and productivity.
Clamps
One tool that you absolutely need for your tiny house framing is a set of clamps. Clamps are essential for holding pieces of wood together securely during the construction process. They provide stability and ensure that your framing is precise and accurate.
There are different types of clamps available, and each serves a specific purpose in the framing process. One type of clamp that is commonly used in framing is the bar clamp. These clamps have a long metal bar that can be adjusted to the desired length. They have a sliding jaw that can be tightened or loosened to hold the wood in place. Bar clamps are versatile and can be used to hold different sizes of lumber.
Another type of clamp that you will find useful is the pipe clamp. These clamps have a long metal pipe that can be threaded onto a base and tightened to hold the wood together. Pipe clamps are ideal for larger pieces of lumber and provide a strong and secure grip.
Additionally, you may also need C-clamps for smaller, more delicate pieces of wood. These clamps have a C-shaped frame with a screw that can be tightened to hold the wood in place. C-clamps are great for precise and detailed work.
Having a set of clamps is crucial for the framing process of your tiny house. They ensure that your construction is sturdy and accurate. Bar clamps, pipe clamps, and C-clamps are just a few examples of the types of clamps that you may need. Make sure to choose the right clamps for your specific framing needs to achieve the best results.
Ear & Eye Protection
Protect your ears and eyes while working on your tiny house framing by wearing the appropriate safety gear. When it comes to ear protection, earmuffs or earplugs are essential. They prevent hearing damage from loud noises generated during construction. Earmuffs provide a comfortable fit over the ears and offer a higher level of noise reduction compared to earplugs.
Look for earmuffs that have a noise reduction rating (NRR) of at least 25 decibels to ensure adequate protection. Alternatively, you can opt for disposable foam earplugs that are inserted into the ear canal and expand to create a seal. These earplugs are convenient and budget-friendly, making them a popular choice among DIY enthusiasts. Remember to replace your earplugs regularly to maintain their effectiveness.
When it comes to eye protection, safety glasses or goggles are a must-have. They protect your eyes from flying debris, dust, and other particles that can cause serious injuries. Safety glasses should have side shields to provide complete coverage and shield your eyes from any angle. Look for glasses with impact-resistant lenses that meet ANSI Z87.1 standards for maximum protection.
If you need additional protection, consider using goggles. They completely seal around your eyes, providing a tighter fit and preventing any particles from entering. Make sure the goggles have anti-fog properties to maintain clear vision throughout your work. Remember, even a small particle can cause severe damage to your eyes, so never compromise on eye protection.
By wearing the appropriate ear and eye protection, you can ensure your safety while working on your tiny house framing project.
Work Gloves
Don’t forget to slip on a pair of sturdy work gloves before diving into your tiny house framing project – they’ll keep your hands safe and protected.
When it comes to choosing the right work gloves, there are a few key factors to consider. First, you’ll want to look for gloves that are made from durable materials such as leather or synthetic leather. These materials offer excellent protection against cuts, abrasions, and punctures, which are common hazards when working with framing tools.
Additionally, make sure the gloves have reinforced palms and fingers, as this will provide extra durability in high-stress areas.
In terms of fit, it’s important to find gloves that are snug but not too tight. This will ensure that you have a good grip on your tools without sacrificing comfort. Some gloves also feature adjustable wrist closures, allowing you to customize the fit for added security.
When it comes to insulation, look for gloves that are lined with a breathable material such as cotton or fleece. This will help keep your hands comfortable and sweat-free, even during long hours of work.
Finally, consider gloves with added features such as touchscreen compatibility or built-in impact protection for added convenience and safety.
With the right work gloves, you can tackle your tiny house framing project with confidence and peace of mind.
Mask
Make sure you grab a mask before you start working on your tiny house framing project – it’s like having a shield against harmful dust particles, just like a knight protecting themselves from arrows with their armor.
When it comes to framing a tiny house, there’s no doubt that there will be a lot of cutting, sawing, and nailing involved. These activities can generate a significant amount of dust and debris, which can be hazardous if inhaled. That’s where a good quality mask comes in handy.
A mask specifically designed for construction work will have a high filtration efficiency, ensuring that the air you breathe is clean and free from harmful particles. Look for a mask with a rating of N95 or higher, as these masks are capable of filtering out at least 95% of airborne particles. The mask should also have a snug fit around your face, with adjustable straps to ensure a proper seal. This will prevent any gaps through which dust particles can enter. Additionally, consider a mask with a valve, as it allows for easier breathing by expelling exhaled air and reducing heat buildup within the mask.
By wearing a mask, you are not only protecting your lungs from dust and debris but also safeguarding your health and well-being during the construction process. So make sure to prioritize your safety and grab a mask before you start framing your tiny house.
Tool Belt
Wearing a tool belt is like having a portable workshop right at your fingertips. It’s an essential tool for any framing project, including building a tiny house.
A tool belt allows you to keep your most frequently used tools within easy reach, saving you time and effort. Whether you’re measuring, cutting, or nailing, having your tools conveniently stored on your waist will increase your efficiency and productivity.
A good tool belt should have multiple pockets and compartments to hold a variety of tools. Look for one that has a hammer loop, tape measure holder, and a large main pocket for larger tools. It should also be made of durable materials, such as heavy-duty nylon or leather, to withstand the rigors of construction work. Additionally, adjustable straps will ensure a comfortable fit and prevent the belt from sliding down while you work.
When choosing a tool belt, consider the type of tools you’ll be using. Make sure the pockets and compartments are the right size to accommodate your tools and keep them secure. It’s also a good idea to choose a tool belt with additional features, such as a built-in level holder or a pocket for your phone.
Remember to regularly clean and maintain your tool belt to prolong its lifespan and keep it in good working condition. Wearing a tool belt not only keeps your tools organized and easily accessible but also adds a professional touch to your framing work. It’s an indispensable tool for any tiny house project.
Ladders
Climbing up the ladder to reach new heights in your construction project can be a stepping stone to success. When it comes to framing a tiny house, having a reliable ladder is essential.
One of the most popular options is the extension ladder. These ladders are adjustable in length, allowing you to reach different heights with ease. Look for one that has a sturdy construction, such as aluminum or fiberglass, as these materials are both lightweight and durable.
Another type of ladder that can come in handy for framing a tiny house is the step ladder. These ladders are self-supporting and have a wide base, providing stability and support while you work. Step ladders are great for tasks that require you to work at a fixed height, such as installing siding or painting. Look for a step ladder that has a high weight capacity and non-slip steps for added safety.
Regardless of the type of ladder you choose, it’s important to follow proper ladder safety guidelines. Always make sure the ladder is on a stable surface, and never exceed the maximum weight capacity. Additionally, be mindful of your balance and use caution when climbing up or down the ladder.
By investing in a reliable ladder and practicing proper safety measures, you can ensure that your framing project for your tiny house is a success.
Conclusion
In conclusion, building a tiny house requires a careful selection of essential framing tools.
Throughout this buying guide, we’ve discussed the importance of layout and measuring tools, as well as the hand and power tools necessary for constructing a tiny home.
By investing in quality tools, you can ensure precision and efficiency in your building process.
Just like a conductor needs their baton to lead an orchestra, a builder needs their framing tools to orchestrate the construction of a tiny house.
Each tool plays a crucial role in creating a sturdy and well-built structure.
From the tape measure that acts as the conductor’s baton, ensuring accurate measurements, to the nailer that acts as the violinist, driving in the nails with precision and speed, each tool has its unique contribution.
As you embark on your journey to build a tiny house, remember that the right tools are your trusty companions.
They will guide you through the intricate process of layout and measuring, provide you with the strength and precision of hand and power tools, and secure the integrity of your structure with nailers.
Choose your tools wisely, for they’ll be the symphony of your construction project.
So go forth, armed with knowledge and the right tools, and create your harmonious tiny home.