

A new construction electrical checklist is a verification list of code-required and quality-driven electrical installations a home needs before final inspection, covering panel capacity, wiring, outlets, safety devices, and future-proofing. I built this checklist because most buyers never see behind the drywall, and that’s exactly where electrical quality gets decided.
I’ve walked enough job sites to know corners get cut where no one’s looking. Twenty-five items decide whether your home performs safely for decades.
This guide covers panel capacity and whole-home wiring standards, outlet and circuit protection code requirements, dedicated circuits for appliances and future technology like EV chargers, exterior and safety systems, and how to verify everything at your final walkthrough.
Why Electrical Planning Matters Before Construction Starts
Electrical planning determines whether your home can safely handle current and future power demands, and it has to happen before rough-in, not after. I’ve seen homeowners add a hot tub or workshop two years after closing, only to discover the panel has zero room left.
Permits and inspections exist to catch wiring mistakes before walls close them in. A licensed electrician pulls permits, follows the National Electrical Code, and schedules rough-in and final inspections with your local building department.
Permits and Inspections Timeline
Electrical permits get pulled before any wire is run, and inspections happen at two stages: rough-in (before drywall) and final (before occupancy). Skipping either stage creates problems that are expensive to fix later.
Working With a Licensed Electrician vs. General Contractor
A general contractor manages the overall build, but a licensed electrician performs and certifies the actual wiring. I always confirm the electrician holds an active state license, because an uncertified sub creates liability that follows the house.
Service Panel and Electrical Load Capacity (Must-Haves 1-3)
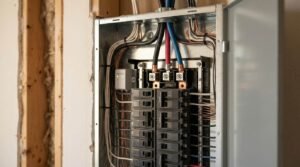
The electrical service panel is the central distribution point that must be sized to handle the home’s full current load plus reasonable future growth, typically 200 amps for most new single-family homes. Undersizing the panel is one of the most common and costly mistakes I see in new builds.
A 200-amp panel gives modern homes enough headroom for HVAC, electric ranges, EV chargers, and workshop equipment without tripping breakers constantly. The National Electrical Code sets minimum ampacity rules, but code minimums are a floor, not a target for a well-built home.
Panel Size and Amperage Requirements
Panel sizing starts with a true load calculation, not a guess based on square footage. Most electricians size panels for current appliances, HVAC, and at least one major future addition like a pool or EV charger.
Load Calculation for Future Additions
A proper load calculation adds headroom for additions you haven’t installed yet. I ask every electrician to size for at least 20% spare capacity so the panel isn’t maxed out on day one.
Surge Protection at the Panel
Whole-home surge protection gets installed directly at the panel, catching power spikes before they reach sensitive electronics and appliances throughout the house. A 2024 study from the Electrical Safety Foundation found that homes without whole-panel surge protection report appliance failures at nearly double the rate after grid disturbances.
Whole-Home Wiring Standards (Must-Haves 4-6)

Whole-home wiring refers to the gauge, material, and routing of every electrical conductor in the house, and it determines both safety and long-term performance. Copper wiring remains the standard for residential construction because of its conductivity and durability.
Aluminum wiring shows up in older homes and occasionally in budget new builds for larger gauge runs. I steer homeowners toward copper for branch circuits every time, since aluminum requires special connectors and more frequent maintenance to prevent loose-connection fires.
Copper vs. Aluminum Wiring
Copper conducts electricity more efficiently than aluminum and expands less under heat, which keeps connections tighter over time. Aluminum costs less upfront but carries a documented higher risk of connection failure at outlets and switches.
Wire Gauge Matching to Circuit Load
Wire gauge has to match the amperage of its circuit breaker, or the wire overheats before the breaker trips. A 20-amp kitchen circuit needs 12-gauge wire at minimum, and I check this detail on every rough-in walkthrough.
Outlet Placement and Spacing Code Requirements (Must-Haves 7-9)
Outlet spacing code requires that no point along a wall be more than six feet from an outlet, ensuring no area of a room depends on an extension cord. This rule, combined with room-specific requirements, shapes how many outlets a new home actually needs.
Kitchens and bathrooms carry stricter rules than living spaces because of water exposure and appliance load. Builders who stick to bare code minimums often leave homeowners short on outlets in garages and home offices.
Kitchen and Bathroom Outlet Rules
Kitchen counters need outlets spaced so no point is more than 24 inches from one, and bathroom outlets must sit within three feet of the sink edge. Both locations require GFCI protection without exception.
Garage, Outdoor, and Basement Outlets
Garages, unfinished basements, and outdoor areas all require at least one GFCI-protected outlet by code, but a well-built home typically installs more than the minimum for workshop and tool use.
GFCI and AFCI Protection Requirements (Must-Haves 10-11)
Ground-fault circuit interrupters (GFCI) protect against electrical shock in wet locations, while arc-fault circuit interrupters (AFCI) protect against fires caused by damaged wiring, and current code requires both throughout most of a new home. These two protections work differently and cover different hazards, which is why both matter.
GFCI outlets or breakers are mandatory in kitchens, bathrooms, garages, basements, and all exterior locations. AFCI protection, meanwhile, now extends to nearly every living space in the house, not just bedrooms as older code once required.
Where GFCI Outlets Are Legally Required
GFCI protection is required anywhere water and electricity might meet: kitchens, bathrooms, laundry rooms, garages, unfinished basements, and all outdoor outlets.
Where AFCI Breakers Are Legally Required
Current National Electrical Code requires AFCI protection on nearly all 120-volt branch circuits feeding living areas, including bedrooms, living rooms, dining rooms, and hallways.
Lighting Circuits and Switch Planning (Must-Haves 12-13)
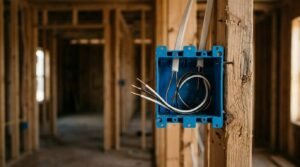
Lighting circuits are dedicated wiring runs that power fixtures and switches separately from outlet circuits, preventing a single overloaded circuit from controlling both lights and appliances. Separating these circuits keeps a tripped breaker from plunging a room into darkness while you’re using a kitchen appliance.
Smart switches and three-way wiring add complexity that has to get planned before drywall goes up. I’ve seen homeowners want smart lighting after the walls closed, and retrofitting that wiring costs far more than wiring it correctly the first time.
Dedicated Lighting Circuits
Dedicated lighting circuits typically carry 15 amps and serve only fixtures and switches, isolated from the higher-draw outlet circuits in the same room.
Three-Way and Smart Switch Wiring
Three-way switches let you control one fixture from two locations, like a hallway or staircase, and require a neutral wire run specifically for smart switch compatibility.
Dedicated Circuits for Major Appliances (Must-Haves 14-16)
Major appliances like ranges, dishwashers, microwaves, and HVAC systems each require their own dedicated circuit sized to their specific amperage draw, preventing shared-circuit overloads. Running an appliance on a shared circuit is one of the fastest ways to trip breakers and degrade wiring over time.
Kitchens alone typically need five or more dedicated circuits once you count the range, dishwasher, microwave, disposal, and refrigerator. HVAC and water heating equipment carry their own separate high-amperage requirements.
Kitchen Appliance Circuits
A kitchen typically needs dedicated circuits for the range (40-50 amps), dishwasher, garbage disposal, microwave, and refrigerator, each sized to the manufacturer’s specification.
HVAC and Water Heater Circuits
HVAC systems and electric water heaters draw enough current that they require their own dedicated high-amperage circuits, separate from every other load in the home.
Smart Home and Low-Voltage Wiring Pre-Installation (Must-Have 17)

Low-voltage wiring pre-installation means running conduit and cable for smart home devices, security systems, and network hardware before walls are finished, since retrofitting these systems later means cutting into drywall. I tell every client planning smart features to decide on their system before framing is complete.
Structured wiring for thermostats, cameras, speakers, and network access points costs a fraction to install during construction compared to after move-in.
EV Charger and Future-Proofing Rough-In (Must-Have 18)
EV charger rough-in means installing a dedicated 240-volt circuit and conduit to the garage during construction, even if a charger isn’t purchased yet, so the home is ready whenever one is needed. This single addition has become one of the most requested items in new construction over the past three years.
Running the conduit and breaker space now costs far less than trenching through a finished garage floor later. I recommend a minimum 50-amp dedicated circuit for most modern EV chargers.
Generator and Backup Power Readiness (Must-Have 19)
Generator readiness means pre-wiring a transfer switch and dedicated generator inlet during construction, allowing a backup generator to power the home without rewiring after a storm. Florida’s hurricane exposure makes this one of the more practical additions for new builds in this market.
A transfer switch safely isolates generator power from the utility grid, preventing backfeed that can injure utility workers during outages.
Outdoor and Exterior Electrical Requirements (Must-Haves 20-21)

Exterior electrical work includes weatherproof outlets, landscape lighting circuits, and security system wiring, all of which must be rated for outdoor exposure and moisture. Exterior electrical components face sun, rain, and temperature swings that indoor components never encounter.
Every exterior outlet requires a weatherproof, in-use cover that protects it even while something is plugged in. Landscape and security lighting circuits typically run on timers or smart controls wired during the original build.
Exterior Outlet Weatherproofing
Exterior outlets require GFCI protection plus an in-use weatherproof cover rated to keep the outlet protected from rain even with a cord plugged in.
Landscape and Security Lighting Circuits
Landscape lighting typically runs on a separate low-voltage transformer circuit, while security lighting and cameras often share a dedicated circuit wired to a timer or smart hub.
Grounding and Bonding Systems (Must-Have 22)
Grounding and bonding create a safe path for electrical faults to travel into the earth instead of through a person or structure, and together they form one of the most safety-critical systems in a new home. A grounding electrode system typically includes a ground rod, water pipe bond, and connection back to the service panel.
Bonding connects all metal components, like water pipes and gas lines, so they share the same electrical potential and never become energized during a fault. Data from the Consumer Product Safety Commission shows improper grounding contributes to thousands of home electrical fires annually, making this system worth verifying personally rather than taking on faith.
A properly grounded system also protects sensitive electronics from voltage fluctuations that an ungrounded system would pass directly through.
Electrical Safety Devices and Detection Systems (Must-Haves 23-24)

Electrical safety devices include interconnected smoke and carbon monoxide detectors plus tamper-resistant and arc-fault protected receptacles, all required by current residential code. These systems work together to catch both fire risk and electrical hazards before they become dangerous.
Interconnected detectors mean every smoke alarm in the house sounds simultaneously, no matter where the fire starts. Tamper-resistant receptacles have built-in shutters that block foreign objects, a requirement in any home with young children in mind.
Smoke and Carbon Monoxide Interconnection
Interconnected smoke and carbon monoxide detectors are wired so that one triggered alarm sounds in every unit in the house, giving occupants faster warning regardless of which floor the hazard starts on.
Arc-Fault and Tamper-Resistant Receptacles
Tamper-resistant receptacles use internal shutters to prevent foreign object insertion, and current code requires them throughout nearly all living areas of a new home.
Final Walkthrough and Inspection Verification (Must-Have 25)
The final electrical walkthrough is your last opportunity to verify every item on this checklist before closing, and it should happen with the electrician present, not just the general contractor. I treat this walkthrough as non-negotiable for any homeowner serious about verifying construction quality.
Reading the inspection report line by line tells you whether the inspector flagged anything, and whether it was corrected before sign-off.
What to Ask During the Final Electrical Walkthrough
Ask the electrician to test every GFCI and AFCI device, confirm panel labeling matches circuits, and walk every room to count outlets against the original plan.
Reading Your Electrical Inspection Report
An inspection report lists every item checked, any violations noted, and whether a re-inspection was required, giving you a paper trail independent of what the builder tells you.
Choosing a Builder With Strong Electrical Standards

A builder with strong electrical standards exceeds code minimums voluntarily, uses licensed electricians rather than unlicensed subs, and welcomes homeowner questions throughout the process. I’ve found the builders worth trusting are the ones who explain their electrical choices without being asked twice.
Builder quality shows up most clearly in the details nobody asks about: panel headroom, wire gauge choices, and whether safety devices exceed code minimums.
Conclusion
A well-built home treats electrical work as a system, not an afterthought, from panel capacity to grounding to final inspection. These 25 must-haves give prospective homeowners a measurable way to evaluate construction quality beyond marketing claims. We built this checklist to help you ask sharper questions, and our team at Tiny Home Builders Florida is ready to walk through every item with you.
Frequently Asked Questions
What electrical must-haves are required in new home construction?
New construction requires proper panel sizing, GFCI and AFCI protection, dedicated appliance circuits, grounding and bonding, and interconnected smoke detection. These items form the baseline for code compliance and long-term safety.
How many amps should a new construction panel have?
Most new single-family homes need a 200-amp panel to handle current appliances plus reasonable future growth. Larger homes or those planning major additions may need 400-amp service.
Do all outlets need GFCI protection in a new build?
No, GFCI protection is required specifically in kitchens, bathrooms, garages, basements, and outdoor locations. Interior living spaces away from water sources typically don’t require it.
What is the difference between AFCI and GFCI protection?
GFCI protects against electrical shock from ground faults, typically near water. AFCI protects against fires caused by damaged or arcing wiring inside walls.
How many dedicated circuits does a new home need?
Most new homes need 15-20 dedicated circuits covering the kitchen, HVAC, water heater, and major appliances. Exact counts depend on home size and appliance load.
Should I wire for an EV charger during construction?
Yes, running a dedicated 240-volt circuit during construction costs far less than retrofitting one later. This has become a standard request in new Florida builds.
What should I check during the final electrical walkthrough?
Test every GFCI and AFCI device, confirm panel labeling matches your circuits, and count outlets against the original floor plan. Request the inspection report as part of this walkthrough.